

In this article, we are going to walk through how to apply a mouseover effect on an background image that will then display text in place of the image. We accomplish this by using multiple container elements, a hover state (when you mouse over something), some negative margin, and some creative styling techniques. In simple terms, this moves the container and all its contents over top of the image. It is a little bit more involved than that, but once you have completed this article, you will get the gist of it.
Seeing is believing!
If you are a visual based learner, we have also created a fully narrated video (voiced over by our Technical Guru, Adam East) that walks you through the entire process. You can skip ahead and watch the video or follow along at your own pace by working through the steps listed below.
As with many of the effects that we showcase in our different articles, these techniques are not limited to just the types of elements described here. Using the same process will allow you to make some pretty cool designs within Responsive Site Designer.
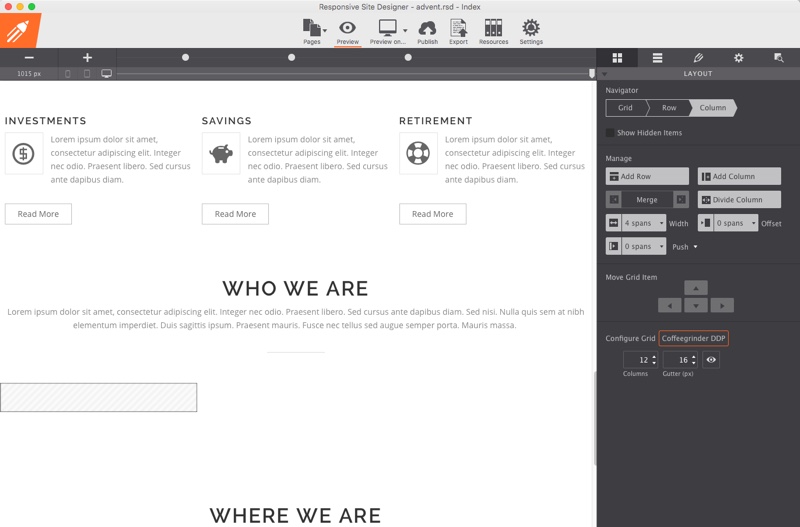
Step 1: Building the layout
The first thing we need to do is setup the layout so that we can add the needed column structure. To get started, download the resources below and then follow along as we walk you through the steps needed to duplicate the example above.
- Open the advent-before.rsd project file and scroll down to the WHO WE ARE row.
- Add a row below this section.
- Change the column span to
4 spans. We will duplicate this column and create the other two later.
Step 2: Adding the team member container
Now that we have the layout setup, we can start adding in our elements and styling them. To start we need to add the container that will be holding our background image.
You can/should use an image where possible
Something to keep in mind is that using an image when possible is always the best option. As you can apply ALT text to an image giving the image an important semantic meaning. This is not possible when using a background image.
- Add a Container element to the column. This container will be used to apply our background image.
- Select it and apply a class name of
team-member-containerfrom the Design pane. - Under the Dimensions section set the max-width to
298pxto contrain the width. - Set the max-height and the min-height to
300px. This allows the container to be no taller and no shorter then 300px, which is the size we want to use for our image. - Apply a
15pxtop margin and check theautoboxes under the left and right margins to center the container. - Now, apply an ID of
team-member-one. This is how we will apply the background image to each container. - Change the Apply To drop down to ID.
- Scroll down to the Background section and under the Image drop down, select Resource and then select businessman-2.jpg.
Step 3: Adding the second text container
With the first container complete, we must now add the text container that will sit on top of the background image container. To do that:
- Add another Container element to the column right below the first container.
- Select the 2nd container and click the design pane, now, give it a class name of
text-container. - Under the Dimensions section, set the max-width to
298px. - Change the max-height to
300px. - Set the min-height to
300px. - Add an all around padding of
8pxto give the content inside some room to breath. - Check the
autoboxes under margins to center the image in the container. - Scroll down to the background section and change the background color to
#ffffff.
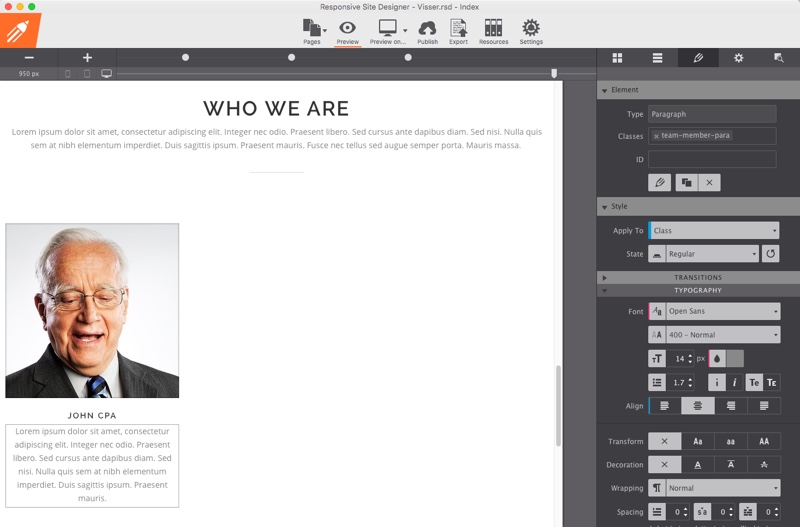
Step 4: Adding the elements to the second container
Now, let’s add some content. These elements will be the text displayed when the image is moused over. Let’s start by adding:
- A Heading 4 element to the 2nd container.
- Then, give it a class name of
team-member-name. - Scroll down to the Typography section and change the font to
Raleway. - Select
700 - Boldfrom the font-weight drop down. - Change the Font-size
17px. - Set the Font color to
#323232. - Set the Text-align to
centerto center the text. - Set Letter-spacing
2px. This will add some space between the letters which will make it easier to read. - Change the text to JIM CPA.
- Now let’s add a Paragraph element below the H4 element.
- Apply a class name of
team-member-infoto it. - Change the Font to
Open Sans. - Set the Font color to
#3d3d3d.
Step 5: Adding the (magic) effects to the hover state
To achieve the mouseover effect, we will be adjusting the 2nd container so that it overlaps the 1st container. Then, we simply make the 2nd container transparent, on the normal (active) state. During this process elements will start to overlap, but don't freak out just yet. ;)
When working with these elements, make good use of the Inspector pane. This powerful tool is extremely helpful when trying to work with elements that are overlapping one another. From the Inspector pane, you can always double-click on any element which takes you to the properties for that element.
- Select the 2nd container and go to the Design pane.
- In the Transitions section set Function to
ease-outand set the Duration to0.9 sec. This will make the container fade out in just under a second. - Scroll down to the Dimensions section and apply a negative top margin of
-307pxto place the text container on top of the image container. - Now, make it transparent by setting the in the Opacity to
0in the Effects section. - Scroll up and under State, select Hover.
- Scroll back down to the Effects section and set Opacity to
1.

Mouseovers and breakpoints
Since mobile devices do not have the capability to hover over images, you need to consider how to present the hover text on them. In this example, you need to ensure the text displays below the image containers. To do this, move the slider down until the 700px breakpoint is selected. Then change the opacity back to 1 and remove the -307px margin from the text-container class. This allows the text to display beneath images when viewed on a mobile device.
Step 6: Creating the remaining columns
Now that you have one column setup, you can duplicate by selecting it and pressing (CMD+D/CTRL+D) and then make the changes each for each of the images by following the same process.
Make sure to change the container ID!
When duplicating the column, you will need to change the 1st container (e.g. team-member-one) ID name to something like team-member-two. This will allow you to apply a different background image to each of the containers.
See it all in action from beginning to end!
Success!
You DID it! Remember, the same process can be applied to any element (not just images) allowing you to create some impressive effects.
For any feedback or questions, you can message Scott or Adam on Facebook, leave a note in the CoffeeCup user forums, or on our Facebook page. Want to share this article? Please help make RSD known to the world by sharing it on any (or all) of the buttons at the top of the page, Twitter, Facebook, Pinterest or Google+.