

You can accept payments via forms made in Web Form Builder by configuring a payment provider. To do so, click the Settings toolbar icon and choose the Payment tab.
To enable payment options in your form, check the box next to Enable form payments. You can now configure the following options.
Fixed Amount
If you'd like a specific amount to be charged each time the form is submitted, enter this amount here and choose the currency you will use from the drop-down menu. If you'd like to use a specific symbol for price listings, check the box next to Custom symbol and enter the character in the box.
This option is used when there is a certain price that is charged each time the form is submitted. For example, if the form was a registration signup for a conference that cost $15 to attend, submitting the form would place a charge for $15.00 to the attendee's credit card.
If you are charging a fixed amount, make sure to clearly inform the buyer that you are doing so somewhere in the form. Then they'll be well aware that they will be charged when they submit the form.
Invoice Label
If your form charges a fixed amount using the option above, this label will be its description in the invoice that the buyer receives once the form is submitted.
Payment Type
You have three choices for payment processing found in the Payment Type drop-down:
- Third Party Gateway: Select this option to use one of the payment processing services in the Payment Options section below. These options allow you to accept credit card payments in your forms.
- Secure S-Drive Payments: Not quite available yet! This option will only be available for forms hosted on CoffeeCup S-Drive. It will use S-Drive's secure payments system.
- Email Invoice: An invoice will be emailed to the buyer when the form is submitted. Basically, this is a "You take care of the rest" payment option. The email invoice that is sent should describe how the buyer can submit payment (i.e. "Send a check payable to…"). You can edit this email by clicking Configure Email.
Click Configure Payment Page to customize the page that the buyer is redirected to when the form is submitted. The payment page is slightly different from a confirmation page:
For a typical non-payment form, the submit button sends the visitor directly to the option you've chosen in the Settings menu's Confirm Options tab. But when form payments are enabled, clicking the submit button sends the visitor to the payment page, where they can click to the payment provider option of their choice to finish the payment. Once payment is completed, they are redirected to the option you've chosen in the Confirm Options tab.
Payment Options
If you've chosen the Third Party Gateway option above, you can use one or more of the payment providers in this drop-down as payment options. To enable a payment provider, select it from the drop-down list, check the box next to Enabled, and enter the proper information in the fields below. Read on for help setting up each payment provider.
Correctly Configuring Your Payment Provider
Each payment provider has a different method for integrating with your form. Generally, each requires an account name or ID, and a password or key. Several of these payment providers will require further information or the correct settings to return feedback to you and the customer, in which case you will need to provide further information.
To properly set up your payment options, find the method(s) you intend to use in the list below, and follow the instructions listed for each service.
PayPal Website Payments Standard
If you use PayPal Website Payments Standard, when your visitors submit the form, they will be directed to a page that allows them to log into their PayPal account or pay by credit card.
To use PayPal Website Payments Standard, you will need to have upgraded your account to either a Premier or Business account. You will then provide the email address associated with your PayPal business or personal account as well as an identity token. Here's how you get it.
You're going to need to enable Auto Return first, followed by enabling the Payment Data Center.
- Log in to your PayPal account.
- In the top menu, click the Gear icon to access your profile.

- Click My selling tools.
- Click Update beside Website preferences.
- Turn on Auto Return.
- In the Return URL field, enter the URL where your form is located (e.g. http://www.mywebsite.com/forms/). This step is required by PayPal, but won't affect how your form works.
- Scroll down to the bottom of the page and click Save.
- Turn on Payment Data Transfer.
- Scroll down to the bottom of the page and click Save.
- Scroll back up to the Payment Data Transfer section and copy the identity token.
- Return to Web Form Builder's Payment tab, choose PayPal Website Payments Standard from the Payment Options drop-down, and check the box labeled Enabled.
- Enter your PayPal Account Email Address and Identity Token in the provided spaces.
Authorize.Net
For Authorize.Net to work properly, you'll need to obtain a transaction key and enable Relay Response. Here's how it's done:
- Log into your Authorize.Net account.
- Go to Account > Settings > API Login ID and Transaction Key.
- Write down the values for both your API Login ID and your Transaction Key.
- You may need to create a new transaction key by answering the Secret Question in the space below.
![]()
- Return to Web Form Builder's Payment tab, choose Authorize.Net from the Payment Options drop-down, and check the box labeled Enabled.
- Enter your API Login ID and Transaction Key in the provided spaces.
2Checkout
To successfully use 2Checkout as a payment provider, you'll need to obtain your vendor account number and secret word and provide redirect information. Here's how to do it:
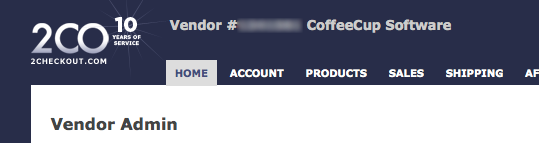
- Log into your 2Checkout account.
- To obtain your vendor account number, simply look in the upper left-hand corner of the page.
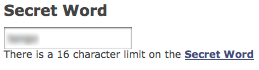
- To obtain your secret word, go to Account > Site Management > Secret Word.
- Return to Web Form Builder's Payment tab, choose 2Checkout from the Payment Options drop-down, and check the box labeled Enabled.
- Enter your Vender Account Number and Secret Key in the provided spaces.