

When your website is ready for life on the web, you have two publishing options:
- FTP Account
- Sync with S-Drive
You can access these options by going to File > Upload to Server, or clicking the Upload toolbar button.
FTP Account
If you are uploading to your own server, you can manually upload your website’s files via an FTP program, or you can use The HTML Editor’s built-in FTP upload system. You’ll need to enter all of your server’s information first.
If setting up an FTP server is too intimidating, consider publishing your website to S-Drive. This method simply requires entering your CoffeeCup username and password to upload your website.
To set up your server profile, go to File > Upload to Server > FTP Account > Add or Edit Servers… This opens the Server Configuration window.
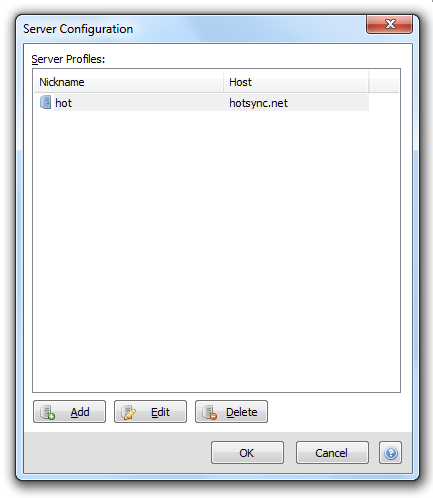
Click the Add button. This opens the Add window.
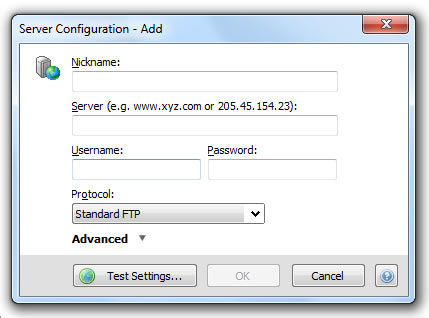
Put the following information in the provided fields:
Nickname
A personal reminder you can use to tell your servers apart. Name your servers anything you want.
Server
The location where you will upload your website files. It should be in the form of an IP address, your domain name (e.g. yourdomain.com), or your domain name preceded by ftp. (e.g. ftp.yourdomain.com). Do not include ftp:// or http://. It is up to your web hosting company to assign your FTP server host name, so you will need to find out from them what it is.
Examples of valid server names
- ftp.mysite.com
- 24.24.100.100
- mysite.com
Examples of invalid server names
- ftp://ftp.mysite.com
- http://www.mysite.com
Username
The FTP username assigned to you by your web hosting company. Be sure to enter the information exactly how it was given to you by your provider. Usernames are case sensitive, so if there are capital letters in your username, you must enter it that way.
Password
The FTP password assigned to you by your web hosting company. Be sure to enter the information exactly how it was given to you by your provider. Passwords are case sensitive, so if there are capital letters in your password, you must enter it that way.
Protocol
Your preferred FTP connection. Standard FTP is fine for most connections. Clicking the Advanced link displays additional information you may need to add.
Port
A port defines how the server responds to a certain protocol. This number is usually 21, and unless your hosting provider has told you otherwise, you should not change it.
Passive Mode
Checking this box activates passive mode. Enable passive mode if you experience trouble connecting.
File Upload Overwrite
Choose what you would like the program to do when it tries to upload a file with the same name as a file already on your folder: ask what you would like to do, automatically overwrite it, or skip that file.
Manage Folder Bookmarks
Folders on your server you would like to bookmark for later use.
When you’re done entering this information, click OK to save it or Test Settings to test your settings.
Uploading Your Work
If you are working with Website Projects, the uploading process is slightly different than the one we describe here.
To upload a file or files to your server, first select them, and then go to File > Upload File to Server, and then select the server you would like to upload them to. If you have specified any folders in the server, you can select one of them as well. This opens the Upload Files to Server window, which displays the status of your file upload.
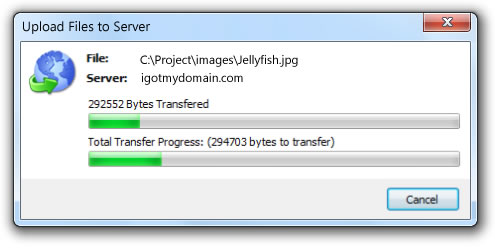
This window closes automatically once the upload is complete. Now you can switch over to the Server tab and check out your files on your server! You’ll notice that your file structure is perfectly preserved, which means all your links and images will be referenced correctly.
Sync with S-Drive
S-Drive is a set of integrated web development services offered by CoffeeCup that include website hosting, live updates/blogging, online store payment processing, web form processing, and more. S-Drive is integrated directly into The HTML Editor as a publishing option. When you use this option, your website will be uploaded to the S-Drive server, where your files can be accessed.
Once you’ve configured your S-Drive account, you’ll be able to upload your website with a single click. It’s amazingly simple to set this up. Just go to File > Upload to Server > Sync with S-Drive to open the CoffeeCup S-Drive Settings window.

Simply enter your CoffeeCup user name and password in the Email Address and Password fields, then click Go! If you don’t have a CoffeeCup account, you can sign up on the CoffeeCup website for free.
You can have more than one CoffeeCup address depending on how you’ve got S-Drive set up. Once you log in with your CoffeeCup account information, all of your web addresses will be displayed.
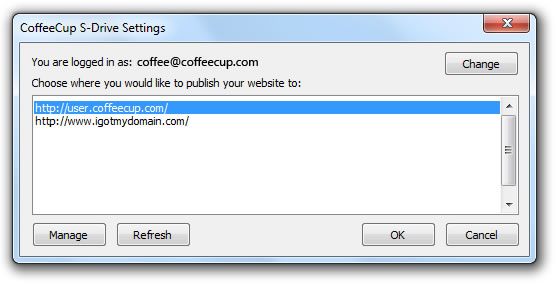
Select the one you wish to use for one-click publishing, and everything’s set up. Click Manage if you need to make administrative changes to your S-Drive account; click Refresh if you’ve added/enabled a web address that’s not in the list.
Now, when you’re ready to publish your website, go to File > Upload to Server > Sync with S-Drive and choose the address you would like to publish your website to.
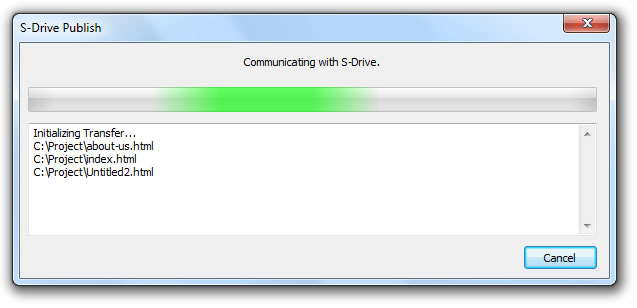
Your website will be published to S-Drive, letting you know what’s happening along the way.
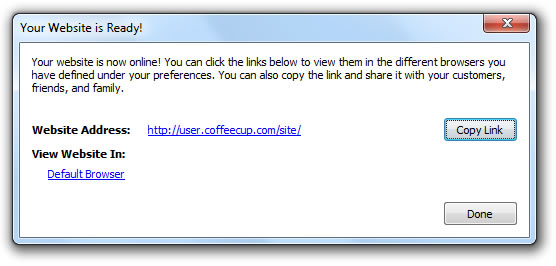
If there are no errors, then your website is available on the web! Congratulations!
Syncing replaces the contents of your S-Drive Site with the contents of your website project. Any files in your Site folder that are not in your website project will be removed.Please ensure that important documents have been backed up before syncing.