

Follow these steps to set up payment in Shopping Cart Creator Pro:
1. Click the Payment button in the Toolbar.This opens the Payment tab of the Shop Settings window.

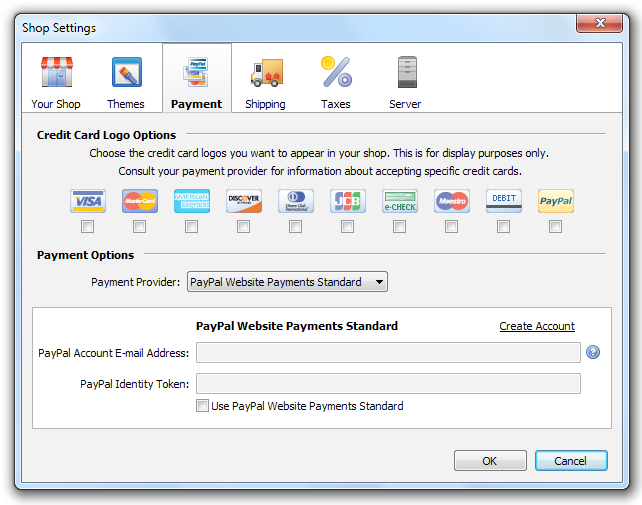
2. If you would like to display credit card icons in your shop, you can select them from the provided list. This step is purely for design purposes, and does not have any bearing on how you accept payment!
3. Select the payment provider(s) you would like to use from the Payment Provider drop-down list.
4. Select the Use [payment provider name] checkbox for all the payment providers you want to use.
5. Enter the required information for the selected payment provider. For more information about how to obtain that information, consult one of the following tutorials. Keep in mind that you will need to set up an account with the payment provider you want to use.
PayPal Website Payments Standard
To use PayPal Website Payments Standard, you will need to provide your PayPal account e-mail address and identity token. Here’s how to obtain the identity token:
- Log into PayPal.
- Click Profile.
- Under the Selling Preferences heading, select Website Payment Preferences.
- Turn on Auto Return.
- In the Return URL field, enter the URL of your online store appended by /checkoutpps.php (e.g. http://www.mywebsite.com/store/checkoutpps.php).
- Scroll down to the bottom of the page and click Save.
- Turn on Payment Data Transfer.
- Scroll down to the bottom of the page and click Save.
- Return to the Payment Data Transfer section and copy the identity token.
PayPal Express Checkout
To use PayPal Express Checkout, you will need to sign up for a PayPal business account and provide an API username and password, as well as a signature. Here’s how to obtain this information:
- Log into your PayPal Business account.
- Click Profile.
- Under the Account Information list, click API Access.
- Select the Request API Credentials option.
- Select Request API Signature.
- Click Agree and Submit.
- Copy your API account username. You can do this quickly by highlighting it with your mouse and using the keyboard shortcut Ctrl+C.
- Click Done.
- Click Grant API Permission.
- Enter your API account username in the appropriate field. You can do this quickly by clicking in the field and using the keyboard shortcut Ctrl+V.
- Select all four boxes.
- Click Submit.
- Click Give Permission.
Authorize.Net
To use Authorize.Net, you will need to provide a merchant account username and transaction key. Here’s how to obtain this information:
- Create an account with Authorize.Net if you don’t already have one.
- Make sure you’re logged into your Authorize.Net account.
- Navigate to the Account area on the left-hand side of the screen, and select Settings.
- Click API Login ID and Transaction Key. This will show your API login ID and transaction key.
By default, your customers will not be redirected to your shop after they make a payment through Authorize.Net. Instead, they will be brought to an Authorize.Net invoice page with a link to your shop at the top. If your users click this link, they will be brought back to your shop, but the cart will still contain the items they just purchased.
If you would like to have your customers redirected to your shop with the cart automatically emptied, log into your Authorize.Net account and navigate to Account > Settings > Relay Response. In the field provided, enter your web shop URL appended by /responseans.php (e.g. http://www.mydomain.com/ shop/authnetrelay.php).
For more information about using Authorize.Net with Shopping Cart Creator Pro, visit this webpage: http://reseller.authorize.net/application.asp?id=761783.
2Checkout
To use 2Checkout, you will need to provide a vendor account number and secret word. Here’s how to obtain this information:
- Log into your 2Checkout account. Your vendor number will be listed in the top left-hand corner of the page.
- To get your secret word, go to Account > Site Management > Secret Word.
WorldPay
To use WorldPay, you will need to provide an installation ID and secret key. Here’s how to obtain this information.
- Log into WorldPay.
- Click the Installations link on the left-hand side of the page.
- Click the Installation Setup Production button near the right-hand side of the page. Your installation ID will be located at the top of the page.
- To create your secret key, scroll to the bottom of the screen and enter any password you want in the MD5 Key field.
- Click Save Changes.