

Link Organization
When you enter the Elements Mode of the program, you are working with an engine that creates the HTML structure of your menu. Although you don't see this while creating the menu, the program is creating HTML code that will work in all browsers.
Menus are basically a grouped collection of links, therefore they are usually constructed using unordered lists. The list is made to look like a menu using a whole bunch of CSS rules. And unordered list starts with the <ul> tag and ends with </ul>. The list contains a set of “list items” that start with the <li> and end with the </li> tag. In these list items we can put links, images, text, or whatever suits your website needs. The “unordered” part means there’s no numbering or letter system to put them in any particular order, they will just be a list. For example this is an unordered list:
- Items in this list have their own lines.
- And many times they have a bullet in front them them looking like this: ●
- Bullets can usually be changed to dashes, or stars, or even images of your choosing.
When you have an “ordered” list it will begin with numbers or letters such as:
- Milk
- Bread
- and so on
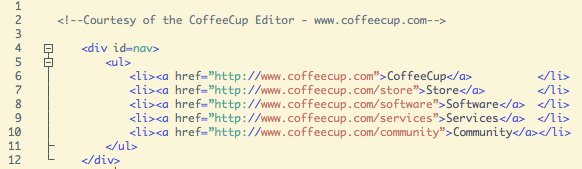
Menus utilize the unordered list setup for grouping the Menu Buttons. The unordered list itself is usually added to a menu or ‘parent container’, the <div> element in our case. The <li> parts of the unordered list are the actual buttons, containing the button text, images, links and whatever else you choose to put in there. The HTML of a basic menu will look something like this.
Figure 1: HTML Code structure for a basic navigation menu.
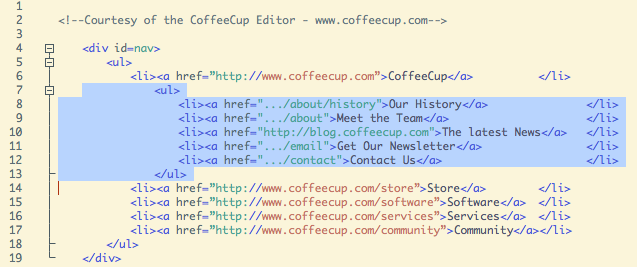
This structure represents the main menu and main menu buttons. Submenus can then be made by adding an unordered list element (the submenu) to one of the main list items with another set of list items, let’s call them sub list items, representing the submenu buttons. The HTML structure for a menu with submenu looks as follows.
Figure 2: HTML Code structure for a navigation menu with submenu (submenu code highlighted).
With the basic HTML element structure in place, you can start working on the layout and design of your menu using CSS. To position the buttons and other menu elements — to build the actual menu layout — margins, paddings, widths, and some other some CSS properties will need to be used. The set of intuitive controls Menu Builder offers makes this process easy and allows for experimenting with the layout settings.
The design is then done by applying properties for the background, border, font style and so on. This can be a pretty daunting and tedious task when done by hand and one of the reasons why we developed a whole series of navigation menu design software over the years and explained in the introductory Chapter. Especially the new Menu Builder makes designing navigation solutions fun again!
Because Menu Builder uses CSS3, you’ll have a lot of power when designing your menu. You can create rounded corners on button and menu borders, apply shadows and effects that mimic images, and much more. More CSS3 controls are in the works as we speak and will be added for your convenience and awesomeness soon.
Everything you do is then written into the CSS file that the program produces when you export the menu. So instead of having to code this all manually, the program will do it all for you just by choosing the styles you want from drop downs, check boxes, color boxes and size ranges. Hopefully, this gives you an idea of what the program is doing for you in the background (pretty cool right?).