

The concept of structured data
By adding descriptive code or markup to the HTML of web pages, search engines can get a better understanding of what your content is about. This better understanding helps the search engines to display content in a useful, relevant way. If you want to know why this should be on the top of your priority list in 2014, you should read this article first.
As an example, on a page that provides information about a product, this descriptive data can be used to specifically tell the search engine what the name of the product is and which of the images on the page picture the product. Text sections that best describe the product can be indicated, even the intended audience and similar products can be described.
The powers descriptive data or meta information offers are enormous, especially for smaller companies with less established brands. Whereas everybody will be able to find their way to the Apple or Porsche (and to some extend even CoffeeCup) websites to buy or find information about one of their products — this is not always easy for companies with a less established brands. The same is true for companies with new or upcoming products or offline companies starting to build out a stronger online presence.
Descriptive information will make it a lot easier for these companies to be found by the intended target audience. Structured data or it ‘semantic wrapping’ as we call it internally, can be used that to get the word out, improve the online presence and gain search rank at minimal costs. Less second guessing by complex search engine algorithms is needed, that’s a good thing and they will very likely reward the websites that show proper implementations.
Adding structured data to a website
Let's assume we wanted to start sharing what we all learned since we started our responsive journey and took a dive into the world of structured data. Writing solidifies the knowledge and, when done from a personal perspective, can offer an interesting and sometimes even controversial behind the scenes look. It's an approach a lot of tech successful companies have taken, so it seems very fitting for a person in a company like CoffeeCup!
Clearly the blog design would be prototyped in Responsive layout Maker — this process helps to consider content ideas and placement (e.g. archive yes / no, small or extensive bio, presentation of most popular articles etc.) and generates a full fledged production ready responsive layout. The layout can be opened in any editor, making it easy to add some design styles or add content. But when opened in The HTML Editor it is also very easy to add semantic wrappers that the search engines like so much and can help to get some top notch search ranks for the various posts and articles! When adding descriptive markup the first step is specifying what the page or page section is about. This is what what the itemscope attribute is used for. A blog, or a blog section on a page would be defined as follows:
<div itemscope itemtype="http://schema.org/Blog">
Actual blog mark and content
</div>
This specifies that everything contained in the div is a blog. With that it will be clear to the search engines (and any other machine having a peek) that it’s a blog they are dealing with. Now we can go into more detail and further describe the various blog sections. Most blogs start with a short description, sometimes about the person or company, sometimes about the blog contents. With also a title or name and an image or icon, the section that (heading) describes the blog in general might look something like this:
<div class=”page-header-row”>
<h1 class=”title”>
Bob’s Blog
</h1>
<image src=”images/bob-the=site-builder.png” alt=”BB”>
<p class=”intro”>
Blog introduction will go here.
</p>
</div>
Now, instead of having the search engine guess what all that means, let’s make it crystal clear! This is done by inserting item properties — characteristics that provide more information about the specified item. To demystify what “Bob’s Blog” means we can tell the search engine that this is the name of the blog by adding itemprop=”name” to the h1. To the paragraph section we can add the description property — that will make it clear this the text within p tags describes what the blog is about and is not for example one of the blog posts. The image is characteristic to the blog, and not simply used for illustration purposes, let’s make that clear to the machines as well. With that the previous example will look as follows and can be unambiguously interpreted by any machines capable of reading the schema.org vocabulary:
<div class=”page-header-row”>
<h1 itemprop=”name” class=”title”>
Bob’s Blog
</h1>
<image itemprop=”image” src=”images/bob-the=site-builder.png” alt=”BB”>
<p itemprop=”description” class=”intro”>
Blog introduction will go here.
</p>
</div>
Finding your way through this huge list of items and properties might be a bit of a challenge. That’s why we added a handy filter based workflow to The HTML Editor. This allows you to select your starting point and specific context - anything from a blog highlighted above to a organization, local business, product, specific event and more! Then, based upon your selection you can then choose the semantic wrappers that are relevant to your situation. You can drag the code right into the markup, guaranteeing correct syntax and code.
Adding schema.org vocabulary with The HTML Editor.
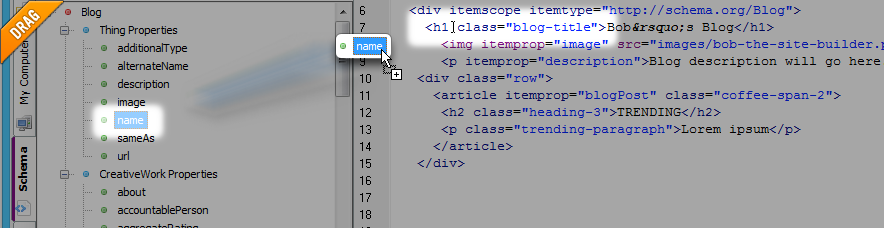
You can also highlight the section you want to semantically wrap and double click on the relevant item or property. The Editor will automatically add spans before and after the selection with the correct descriptive code. Both methods will do exactly what you expect and the search engine will love it (and you).