

In this walkthrough, we’re going to cover how to create and edit users, and then how to grant and remove access to parts of your website.
- Step 1: Adding a user
- Step 2: Adding multiple users
- Step 3: Editing a user profile
- Step 4: Granting access/enabling password protection
- Step 5: Granting access to multiple users
- Step 6: Uploading your work
- Step 7: Removing access/removing password protection
Step 1: Adding a User
To add an individual user, click the Add User button in the Toolbar. This opens the Add User window, which contains options for editing your user’s profile. The only required information is the username and password, but the rest of the information comes in handy for contact purposes, including sending e-mails from inside Website Access Manager. Here’s the information we’re providing for this user, who we’ll call Jane Smith:
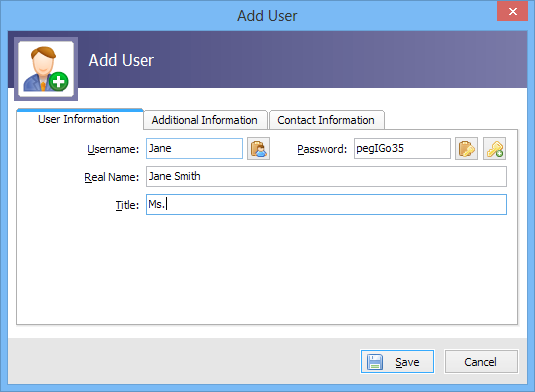
The password in the User Information tab will already be filled in for you, but you can enter a different password if you want. Keep in mind that the most secure passwords are six or more characters long and include mixed-case letters and numbers.
To be honest, the rest of the fields in this window are pretty self-explanatory. Click around and enter as much information as you want. When you have finished entering information for your user, click Save. Jane’s profile will be added to the User Permissions pane.

Step 2: Adding Multiple Users
To add multiple users, go to Users > Add Multiple Users. This opens the Add Multiple Users window. Type as many username–password combinations as you wish in the space provided. Keep in mind that the username and password should be separated with a comma, colon, or space, and that you can only include one username–password combination per line.
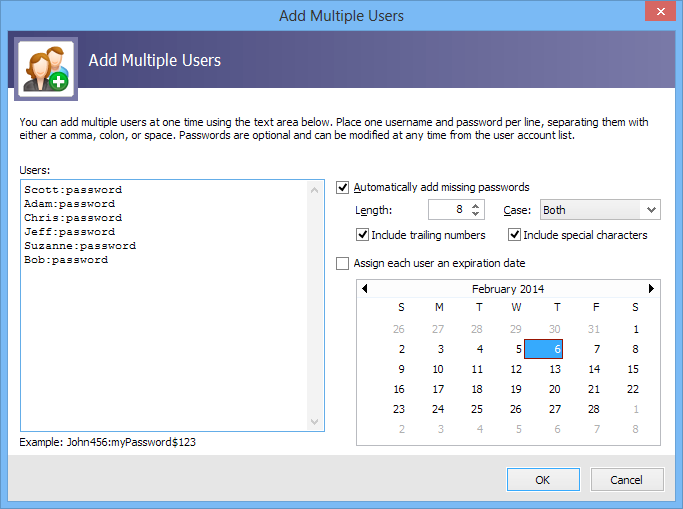
If you want the program to randomly generate passwords for you, check the box next to Automatically add missing passwords and enter one username per line. When the user profiles are created, a randomly generated password will be included automatically. The Add Multiple Users window also presents options for modifying the passwords created by the program.
- Length — Passwords may be no longer than 255 characters in length. A six- to eight-character password is usually secure enough for general purposes.
- Case — You can choose between uppercase, lowercase, or both. Keep in mind that mixed-case passwords are more secure than single-case passwords.
- Include trailing numbers — This option adds a random number to the end of your password. Keep in mind that passwords containing numbers are more secure than those that don’t contain numbers.
You also have the option of setting a date when the user profiles will expire. For now, we won’t worry about it. Now that we’re all done, click OK. The new users will be added to the User Permissions pane.
Step 3: Editing a User Profile
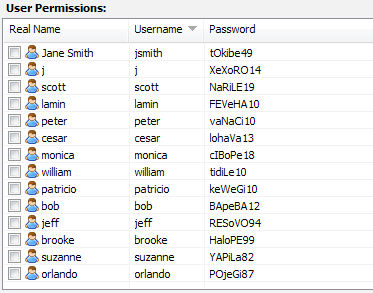
So far so good! Now, let’s edit the information for one of our new users. We’re going to go ahead and select Scott’s profile, and then we’ll click the Edit User button in the Toolbar. This opens the Edit User window. The Edit User window contains the same options as the Add User window with one exception: The field under the User Information tab listing the folders and files the user is authorized to access only appears in the Edit User window.

You can edit any of the fields in the three tabs as explained in Step 1. When you’re done editing, click Save.
Step 4: Granting Access/Enabling Password Protection
In this step, we’re going to give Jane permission to access the images folder in our website. This step also enables password protection for this section of our site by virtue of the fact that if one user has permission to access it, users without permission cannot access it.
First, select the images folder, and then select Jane.
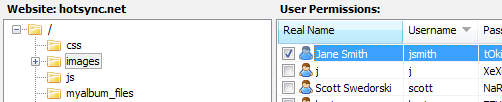
Next, give Jane permission to access this folder by clicking the Grant Access button in the Toolbar. And that’s it! Now when Jane goes to http://www.yourwebsite.com/images/, she’ll be prompted to enter her username and password, and then she’ll be allowed in. She’ll also be able to access all the files and folders inside the images folder.
Getting back to the Website Access Manager workspace, you will notice that a checkmark now appears in the checkbox next to Jane’s name when the images folder is selected. Go ahead and click another folder. You’ll see that the checkmark disappears. That’s because Jane doesn’t have access to that folder.

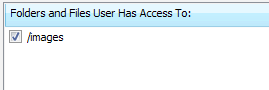
The images folder will also appear in the Folders and Files User Has Access To area.
Step 5: Granting Access to Multiple Users
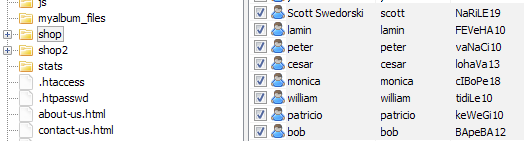
Let’s give Scott, Bob, and all the users in between access to the shop folder. First, select the desired folder and users. To select multiple users, either click Scott, hold down your Shift key, and then click Bob, or draw a box with your mouse that touches Scott, Bob, and all the users in between.
Now grant access using one of the methods described in Step 4. This will add a checkmark to each of these users’ checkboxes in the User Permissions pane. Because multiple users are selected, individual user folder and file permissions cannot be displayed in the Folders and Files User Has Access To pane. However, when you select each of these users individually, the shop folder will appear in this area.
Next, you’ll need to upload these changes. Heres how!
Step 6: Uploading Your Work
Granting access is only the first step to password protecting your website. You have to upload your changes to your server for them to take effect.
You’ll have to set up a server profile in order to upload. For more information about setting up a server profile, read Setting Up a Server Profile.
Click the Upload to Server button in the Toolbar to upload your changes to your server. This opens a window that displays the progress of your upload. You will see the “Process Complete” message when your files are done uploading.
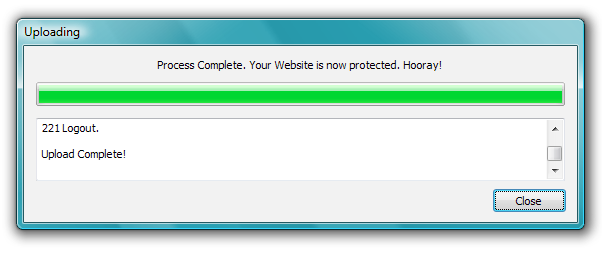
And that’s it! When your upload is finished, click Close.
Step 7: Removing Access/Removing Password Protection
In this step, we’re going to remove Jane’s access to the images folder. This step will also disable password protection for this section of our site by virtue of the fact that if there aren’t any users who have permission to access it, it is open to everyone.
First, select Jane from the User Permissions pane and the images folder in the Website pane. Next, click the Remove Access button in the Toolbar to remove her access. This removes the checkmark from the Jane’s checkbox when the her name and the images folder are selected, and will also remove the folder from the Folders and Files User Has Access To pane. So long, Jane!
Now all you need to do is follow the process outlined in Step 6 to upload these changes to your server.