

Taking your layout created with Responsive Layout Maker and converting it for use with WordPress may sound like a complex task, but the process is quite easy. In our previous article "Exporting your Responsive Layout to WordPress", we walked you through the basics on how to take a layout, break it apart and save it as a WordPress theme. Here we will build on those instructions allowing you to take your own layout and build your theme from that instead.
To make this transition a big easier, it is important that your layout be properly designed from the beginning with the correct usage of Tags, Classes and ID’s for all your rows and columns. What we will cover here are the “best” practices to use for designing your layout.
Setting Up the Basics
WordPress is made up of a collection of template files. These files will hold certain blocks of markup that brings everything together as a WordPress Theme. As covered in "Exporting your Responsive Layout to WordPress", there are 8 basic template files needed to make your layout function. Of these 8 files, only 3 actually contain markup copied directly from your RLM exported website. The remainder of the template files will help you style your theme and add additional functionality.
header.php
As the name says, this is your header. In RLM, select the top row of your layout and go to the Properties Tab. Use the Change Tag option and select Header and assign the Class Name main-header.
footer.php
Again, as the name says, this is your footer. In RLM, select the last row of your layout and go to the Properties Tab. Use the Change Tag option and select Footer and assign the Class Name main-footer.

index.php
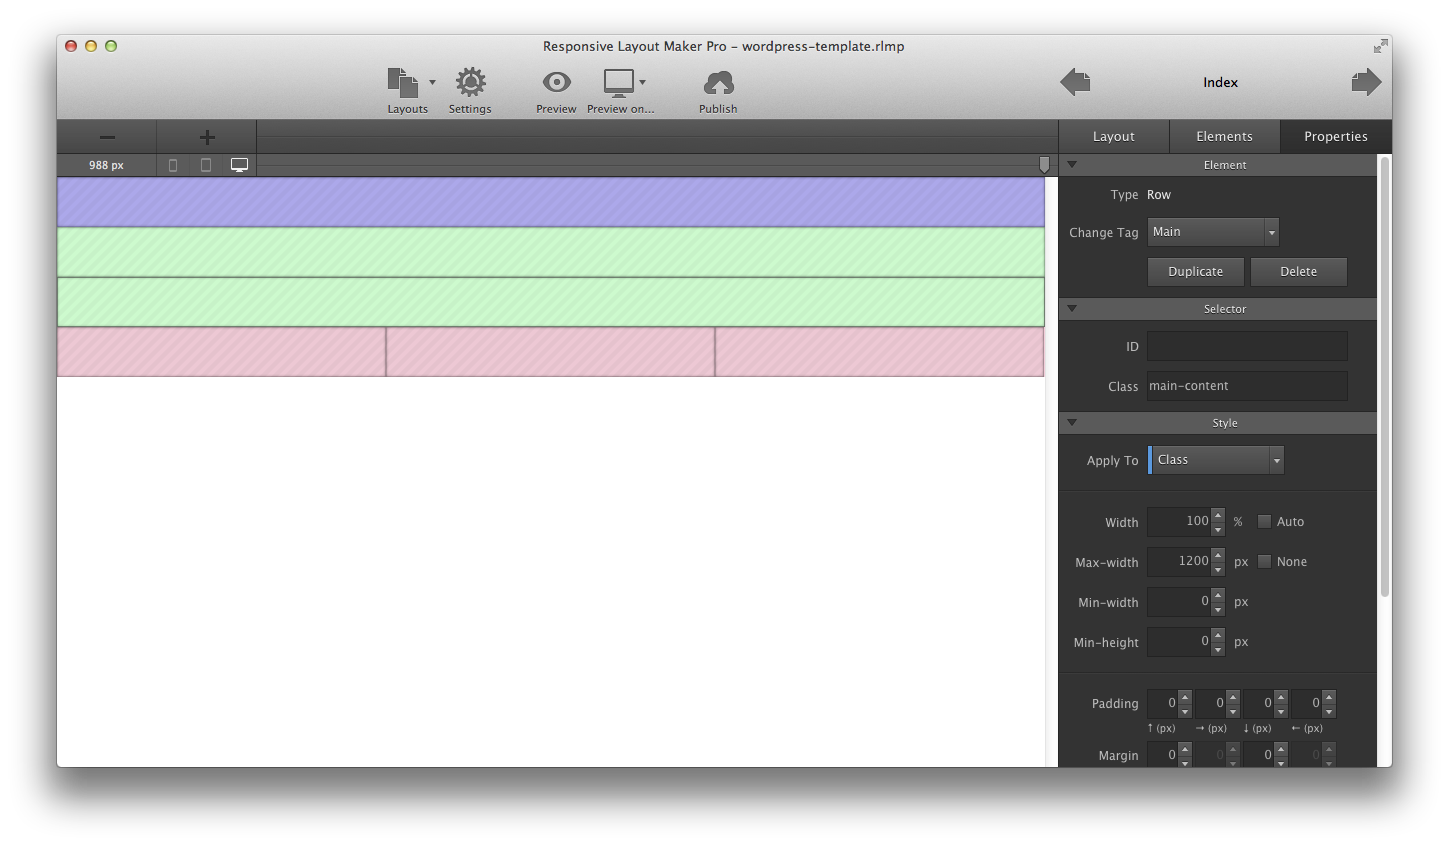
This is for your main content that excludes the header and footer. You can have 1 or more of these rows. In RLM, select the top row of your layout and go to the Properties Tab. Use the Change Tag option and select Main and assign the Class Name main-content.
If you were to now look at the source code of this layout, you can see the markup for the header, main content and footer have clearly been defined in each row. You are going to break this markup up into 3 separate template files (header.php, footer.php and index.php). Refer to Step 5, Step 6 and Step 10 located in the "Exporting your Responsive Layout to Wordpress" to complete this process.
If you take the markup listed below, you would break that up into 3 separate template pages (header.php, index.php and footer.php). It is VERY important to make sure the correct rows and markup are being included in the proper php file. Failure to do so will cause your layout to not display correctly.
header.php
Copy the markup from the <DOCTYPE> to </header>.
index.php
Copy the markup just after the </header> all the way to Row where your footer starts.
footer.php
Copy the markup starting with the code where the Row of your footer starts all the way to the </html>
<!DOCTYPE html>
<html>

<head>
  <meta charset="utf-8">
  <meta name="viewport" content="width=device-width, initial-scale=1.0">
  <title>Index</title>
  <link rel="stylesheet" href="css/coffeegrinder.min.css">
  <link rel="stylesheet" href="css/wireframe-theme.min.css">
  <link rel="stylesheet" href="css/main.css">
</head>

<body>
  <header class="row main-header">
    <div class="coffee-span-12 column-1"></div>
  </header>
  <main class="row main-content">
    <div class="coffee-span-12"></div>
  </main>
  <main class="row main-content">
    <div class="coffee-span-12"></div>
  </main>
  <main class="row main-content">
    <div class="coffee-span-12"></div>
  </main>
  <footer class="row main-footer">
    <div class="coffee-span-4"></div>
    <div class="coffee-span-4"></div>
    <div class="coffee-span-4"></div>
  </footer>
</body>

</html>
Have more pages?
Not a problem. Just repeat this process for each template page that you want to create giving each of them the of prefix page- and then append the name of the WordPress page ending with .php. Example: page-contact.php, page-store.php, page-news.php etc...
Functions File
This is probably one of the most important template pages you will work with. If you are just starting out in WordPress development, this can be one of the most confusing (and scary) parts of the process. Within this file you can create specialized widgets, add global markup to your pages and setup how your menus function just to name a few. Not all of that however is required to make your layout function though. What we will show you here is the minimums needed to give you the basic structure and you can then add upon that later.
One of the most simple things you can do is setup a Widget. These Widgets will then be used to replace elements within your layout with dynamic WordPress content (Blog Posts, Tags, Categories etc.). To set this up, you are going to create a file called functions.php. In this example, we are creating a single Widget and registering two menus (Primary and Secondary). These both can then be used later inside any template page. If you like to have more Widgets, just duplicate the one here and adjust the markup accordingly.
 <?php

add_action( 'widgets_init', 'child_register_sidebar1' );

function child_register_sidebar1(){
    register_sidebar(array(
        'name' 				=>'Default Sidebar',
        'id' 				=>'sidebar-1',
        'before_widget' 		=>'<div id="%1$s" class="widget %2$s">',
        'after_widget' 			=>'</div>',
        'before_title' 			=>'<h4 class="widgettitle">',
        'after_title' 			=>'</h4>',
    ));
}

add_theme_support( 'nav-menus' );
add_action( 'init', 'register_my_menus' );

function register_my_menus() {
	register_nav_menus(
		array(
			'primary-menu' => __( 'Primary Menu' ),
			'secondary-menu' => __( 'Secondary Menu' )
		)
	);
}
Read, Understand and Implement...
Working with the functions.php file does require a little but if understanding on the correct syntax on what can and cannot go into this template file. Simple coding mistakes can cause your website to generate multiple PHP errors, so it is important that what you do add in here is valid and properly coded. You can read up more on how to create and work with the functions file through the Codex website. Refer to Step 7 for a more detailed explanation on the creation of this Widget.
Specialized Template Pages
These types of specialized pages provides you with more control over specific functions that WordPress offers. Using these template pages will come in handy when implementing Widgets within your layouts as it will give you more functionality on how the content is displayed within that template page. You will also find that the markup for these next set of template pages will be identical (but does not have to be) and that they each will return different results when accessed.
archive.php
The archive.php template page provides you with a single page that contains a monthly Archive of all your posts. To set this up, you are going to create a file called archive.php.
category.php
Categories are another way to allow users an easier way to filter through your content. When a viewer clicks on a link to one of the categories on your page, they will be taken to a page listing all the Posts located in that category. To set this up, you are going to create a file called category.php.
page.php
The page.php template page will bring in all the content for any Pages that you have created within WordPress. To set this up, you are going to create a file called page.php.
search.php
As the name implies, the search.php template file allows you to control how your search results are displayed. To set this up, you are going to create a file called search.php.
single.php
This single.php template page will bring in all the content for any Posts that you have created within WordPress. To set this up, you are going to create a file called single.php.
tag.php
Tags allow users an easier way to filter through your content. When a viewer clicks on a link to one of the Tags on any post, they will be taken to a page listing all the Posts using that particular tag. To set this up, you are going to create a file called tag.php.
Same markup but different results
As mentioned earlier, this is the same code used for all these template pages but when accessed through WordPress, you will get completely different results. These are just the most basic of implementations and you will find many more ways to configure these pages over at Codex.
 <?php get_header(); ?>

 <div class="row">
 <!-- WordPress Loop -->
 <div class="blogpostwrapper">
 <?php if (have_posts()) : ?>
 <?php while (have_posts()) : the_post(); ?>
 <div class="blogpost">
 <h3 class="entrytitle" id="post- <?php the_ID(); ?>">  <a href=" <?php the_permalink() ?>" rel="bookmark"> <?php the_title(); ?>  </a>  </h3>
 <?php the_content(); ?>
 </div>
 <?php endwhile; ?>
 <?php else : ?>
 <?php endif; ?>
 </div>
 <!-- End WordPress Loop -->
 </div>

 <?php get_footer(); ?>
Implementation of Widgets
There are a variety of ways in which a Widget can be used. What we are showing you here is how you can replace a block of content generated by RLM with one of the Widgets you created earlier in this tutorial. For this example, you are going to add this markup to the contents of one of the columns located in your footer.php. When this is implemented, you will still see this markup:
 	<div class="row footer-row">
    <div class="coffee-span-4 column-2 coffee-694-span-6 coffee-377-span-12">
	<?php
	if ( is_active_sidebar(2) ) {
	?>
    <?php dynamic_sidebar( 'sidebar-2' ); ?>
    <?php
		} else {
	?>

      <ul class="link-list footer-links">
        <li>  <a href="#">Lorem ipsum dolor  </a>  </li>
        <li>  <a href="#">Suspendisse pulvinar mi  </a>  </li>
        <li>  <a href="#">Aliquam erat volutpat  </a>  </li>
        <li>  <a href="#">Interdum et malesuada  </a>  </li>
        <li>  <a href="#">Suspendisse pulvinar mi  </a>  </li>
        <li>  <a href="#">Suspendisse pulvinar mi  </a>  </li>
      </ul>
      <?php
};
?>
    </div>
Selecting the Widget
To enable Widgets, go the Admin Panel > Appearance > Widgets and enable a Widget for Footer Widget 1. Now when you view your website, you will see the default content has been removed and the Widget content is now in its place. You can learn more about creating your own WordPress Widgets through the Codex website.
Menus
Lorem ipsum dolor sit amet, consectetur adipiscing elit. Morbi lacus leo, tristique id sodales ac, dapibus vitae neque. Morbi vel diam mattis, porta turpis vel, dictum lectus. Donec et enim leo. Vestibulum ante ipsum primis in faucibus orci luctus et ultrices posuere cubilia Curae; Donec sed gravida orci. Ut eleifend, enim non feugiat accumsan, arcu metus consectetur est, et egestas lorem nibh vel enim. Quisque non dui ut purus posuere dictum. Nam vitae augue quis ipsum tristique semper.
Lorem ipsum dolor sit amet, consectetur adipiscing elit. Morbi lacus leo, tristique id sodales ac, dapibus vitae neque. Morbi vel diam mattis, porta turpis vel, dictum lectus. Donec et enim leo. Vestibulum ante ipsum primis in faucibus orci luctus et ultrices posuere cubilia Curae; Donec sed gravida orci. Ut eleifend, enim non feugiat accumsan, arcu metus consectetur est, et egestas lorem nibh vel enim. Quisque non dui ut purus posuere dictum. Nam vitae augue quis ipsum tristique semper.
Congratulations! You just converted your layout for use with WordPress!
All that is left to do is to replace the default Layout Maker graphics by uploading your own images into the img folder and adjust the markup accordingly. You would need to do this in the header.php, index.php and footer.php template files by prefixing <?php bloginfo("template_directory"); ?> in front of all file references.