

In order to put your shop online, you’ll need to upload it to your server. You have two options for this process: Using CoffeeCup S-Drive or another FTP account. Once you’ve set up your S-Drive or FTP account, you can publish your shop.
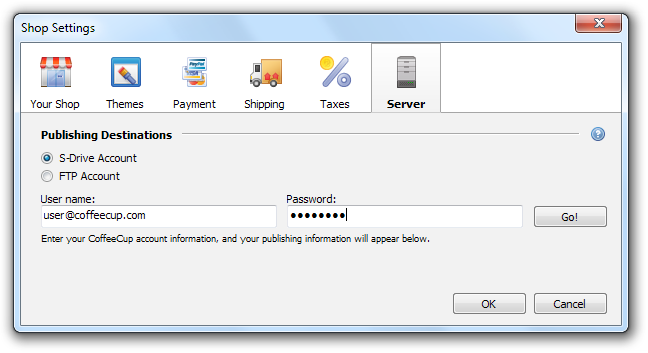
To set up your S-Drive or FTP account, click the Server button. This opens the Server window.

CoffeeCup S-Drive
CoffeeCup S-Drive is an intuitive solution for all your online storage needs — from file storage and sharing to websites, and so much more. Don’t have an S-Drive account? No sweat — you can learn more about it and sign up here: https://www.coffeecup.com/s-drive/
Follow these steps to set up your CoffeeCup S-Drive account.
- Click the Server button. This opens the Server window.
- Enter the e-mail address and password for your CoffeeCup user account in the provided fields.
- Click Go! This brings up a list of your S-Drive sites.
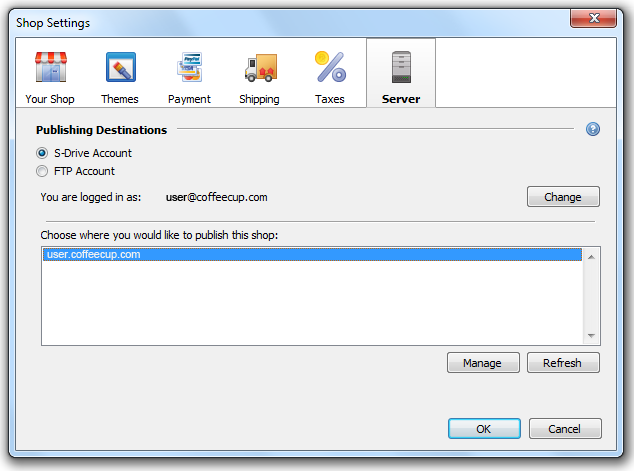
4. Select the location where you want to publish your shop.
5. Click OK.
FTP Account
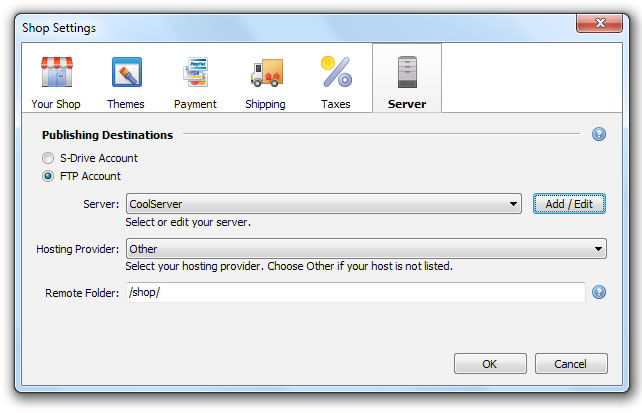
Click the Add/Edit button. This opens the My Servers window.

Enter the information given to you by your hosting provider in the appropriate fields. If you are unsure of any of this information, contact your hosting provider, and they’ll fill you in. Here’s a bit more information about what information goes where:
Nickname
A nickname for the server profile being created. Since it’s just a personal reminder of which server you’re using, you can name it anything you want.
Server
The location where you will upload your website files. It should be in the form of an IP address, your domain name (e.g. yourdomain.com), or your domain name preceded by ftp. (e.g. ftp.yourdomain. com). Do not include ftp:// or http://. It is up to your web hosting company to assign your FTP server host name, so you will need to find out from them what it is.
Examples of valid server names
ftp.mysite.com
24.24.100.100
mysite.com
Examples of invalid server names
ftp://ftp.mysite.com
http://www.mysite.com
Username
The FTP username assigned to you by your web hosting company. Be sure to enter the information exactly how it was given to you by your provider. Usernames are case sensitive, so if there are capital letters in your username, you must enter it that way.
Password
The FTP password assigned to you by your web hosting company. Be sure to enter the information exactly how it was given to you by your provider. Passwords are case sensitive, so if there are capital letters in your password, you must enter it that way.
Show Password
Checking this box shows your password. Leaving it unchecked displays your password as a line of asterisks.
Remember Password
Checking this box saves your password so you don’t need to type it in every time you upload your files to your server.
Passive Mode
Checking this box activates passive mode. Enable passive mode if you experience trouble connecting.
Add server
To add a new server profile, click the green plus sign icon.
Delete server
To delete a server profile, click the red minus sign icon.
More Options
Clicking this button allows you to work with more advanced FTP options.
Protocol
This option lets you specify your FTP connection. You can choose FTP, SFTP over SSH, FTPS over TSL/ SSL, FTPS over SSL, FTPS over TSL, HTTP, or HTTPS.
Port
This option depends on what protocol you are using to connect to your FTP server. When you select a protocol, the program automatically changes to the default port for you.
Proxy
This option lets you configure your proxy settings if your hosting provider requires that you use a proxy. If you aren’t sure whether you use a proxy, you probably don’t. Click the Edit button to open the Proxy Settings window. Here, you can create a new proxy or edit or delete an existing one.
- To add a new proxy, click New, enter the proxy name, proxy URL, username, password, and proxy port in the provided fields, and then click Add.
- To modify an existing proxy, select it from the list on the left, make the necessary changes, and then click Update.
- To delete an existing proxy, select it from the list and click Remove.
Comments
Enter any comments about the server in this field.
Publishing your Shop

If everything looks good, you’re ready to upload your shop! Click the Publish button on the Toolbar.
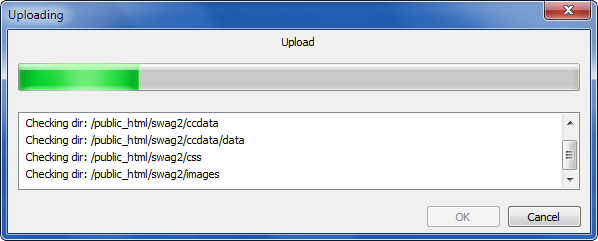
This opens a window that tells you the status of your upload.
When you get “The shop has been uploaded successfully” message, that means the upload is complete. Once you see it, you can open your favorite browser and check out how your new online shop looks.