

Animation Studio includes an image editor that has tools that you can use to fine-tune existing frames. Using the tools in the Edit tab, you can make changes needed to ensure that each frame is perfect.
To edit an image, select it in the Frames tab and click the Edit toolbar button.
On the left side of this tab is a workspace with a (most likely) magnified view of the selected frame. Above this workspace is a ribbon with a bunch of editing tools which are described below. On the right side of this tab is a pane titled Paint, where settings related to the selected tool are located.
Let’s take a closer look at all those tools and their properties. (Note: Hovering the mouse over a tool icon reveals its name and associated shortcut.)
Clipboard Tools
The five tools on the left most section of the tool ribbon are related to the history of changes you make to the frame and copying portions into memory.

Undo (Ctrl+Z)
This tool is very important! Because the editor has no layers, this is the only way to remove changes you’ve made. If you draw the wrong thing, simply click the Undo tool.
Redo (Ctrl+Y)
Bring back changes you removed with the Undo tool.
Revert to original unedited image
Start over with the original frame, removing all changes.
Cut
Remove and place the selected portion of the frame into the clipboard.
Copy
Copy the selected portion of the frame into the clipboard.
Paste
Place the content in the clipboard onto the canvas.
Crop
Remove everything except the selected portion of the frame.
View Tools

Zoom Out
Zoom the canvas view of the frame out.
View
Select a percentage to zoom into and out of a frame.
Zoom In
Zoom the canvas view of the frame in.
Fit
The frame fills the entire canvas, whether zoomed in, zoomed out, or neither.
100%
The frame is shown at the size it will appear on the web.
Selection Tools

Select Rectangle
Draw a rectangle around the portion of the frame you wish to select. Hold the Alt key while drawing to select a perfectly square area. Used only for cutting and cropping.
Select Circle
Draw an ellipse around the portion of the frame you wish to select. Hold the Alt key while drawing to select a perfectly circular area. Used only for cutting and cropping.
Select Free Form
Draw any shape around the portion of the frame you wish to select. To complete the selection, you must end the selection at the starting point. Used only for cutting and cropping.
Magic Wand
Click an area of the frame to let Animation Studio automatically select a portion of the frame.
- Tolerance: How likely the tool is to select pixel that differ from the selected pixel.
- Mode: Choose “From Cursor” to select objects clicked with the cursor, or select “Entire Image” to select all objects in the entire image that are similar to the selected object.
Select/Move Object
Use this tool to select, move, and resize objects created with the drawing tools.
Drawing Tools

Draw Pencil
Draw freehand on the frame.
- Draw Width: The width of the pencil, in pixels.
Draw Line
Draw a perfectly straight line.
- Draw Width: The width of the line, in pixels.
- Draw Style: The style that the line will be drawn in.
Draw Rectangle
Draw a rectangular shape on the frame.
- Draw Width: The width of the border of the rectangle, in pixels.
- Draw Style: The style of the rectangle’s border.
- Fill Style: The style that the rectangle will be filled with.
Draw Ellipse
Draw a rounded shape on the frame.
- Draw width: The width of the border of the ellipse, in pixels.
- Draw Style: The style of the ellipse’s border.
- Fill Style: The style that the ellipse will be filled with.
Draw Memo Text
Add regular text to the image by choosing a font, font size, font styles, and alignment.
Draw Text
Click and drag to add flexible text to the image, and choose a font, font size, and font styles.
- Style: Bend or turn your text to fit a different shape or style.
- Angle: The angle of the arc or line of text.
- Direction: Reverse the direction of the text if necessary.
Erase
Remove content from the frame, rendering it transparent.
- Draw Width: The width of the erase tool, in pixels.
Fill
Fill the selected portion of the frame with the selected color.
- Tolerance: The range of nearby colors that will be filled based on the point that is selected.
Brush Tools

Spray Brush
A tool that gives the somewhat erratic appearance of a spray-painted area.
- Brush Size: The general diameter of the brush, in pixels.
Rectangle Brush
A tool used to draw over larger portions of the frame than what can be covered by the pencil.
- Brush Size: The width of the brush, in pixels.
Circle Brush
A tool that uses a circular brush tip to draw content on the frame.
- Brush Size: The diameter of the brush, in pixels.
Color Tools

Select Color
Click a pixel from the frame to select the pixel’s color for use with other drawing tools.
Adjust Image Colors
This powerful tool applies changes to the entire frame using a variety of color-oriented tools.
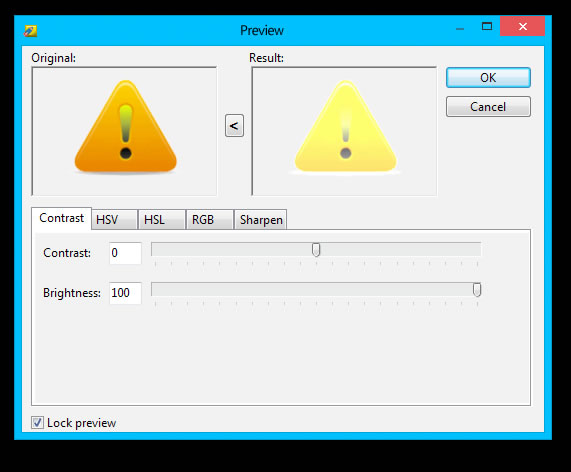
The pane labelled Original shows the current frame before you make any adjustments whatsoever. The pane labelled Result displays a preview of what the frame will look like with the changes you have made in the lower pane. (If the box labelled Lock Preview at the bottom of this window is checked, the Result pane will update as you make changes; otherwise, click the Preview button to preview changes.)
To apply changes you have made to the frame, click the < button in between the two panes. These changes are not permanent until you click OK, so if you decide you don’t want to apply anything you’ve done to the frame, just click Cancel.
The bottom pane has 5 tabs of adjustments you can make to the frame.
Contrast: These two sliders adjust the contrast and brightness of the frame.
- Contrast: Adjust the exaggeration between light and dark portions of the frame.
- Brightness: Make the frame brighter or darker.
HSV: Adjust the colors of the frame using hue, saturation, and value. You can click in the Base color and New color boxes to manually select a color rather than adjusting each of the sliders.
- Hue: The color you wish to apply to the frame.
- Saturation: The colorfulness of the selected hue.
- Value: The brightness or darkness of the selected frame.
HSL: Adjust the colors of the frame using hue, saturation, and luminosity.
- Hue: The color you wish to apply to the frame.
- Saturation: The colorfulness of the selected frame.
- Luminosity: The lightness of the selected frame.
RGB: Adjust the red, green, and blue tint in the frame.
Sharpen: Exaggerates the difference between colors to more clearly define edges.
- Amplitude: Increases the exaggeration of the sharpness.
- Window size: Broadens the effect of the amplitude on the image.
The Color Picker
On the right side of the Edit tab is a panel where you can manage the currently selected colors.
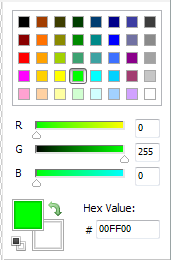
There are four ways to choose a color:
- Choose a hue from the box of colors up top.
- Adjust the RGB sliders below to select a more specific color.
- Enter a numerical value to the right of each of the R, G, and B sliders for an exact value.
- Enter a value into the Hex Value field if you use web codes.
The two boxes in the lower left corner are the Draw and Fill colors.
- Draw Color: The color used by draw tools for lines and borders.
- Fill Color: The color used by shape tools to fill new objects.
Click the two-ended arrow to swap the two colors.
Click the tiny icon in the corner to change the Draw and Fill colors to pure black and white.
Layers
Layers give the chance to make advanced edits to your frames without permanently committing them. By layering canvases on top of the original image, you can make adjustments and remove them if you change your mind.
Drawing onto the Background layer means you’re making changes directly to the original frame image. If you’d like to make changes you can easily remove or reverse, it’s best to add a layer and make your changes there.
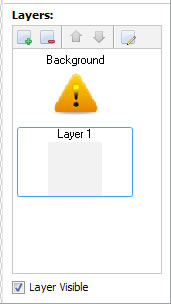
Here’s a description of the buttons at the top of the Layers pane:
- Add a Layer: Place a new layer above the background.
- Delete a Layer: Delete the currently selected layer.
- Move Layer Up: Move the selected layer up the list.
- Move Layer Down: Move the selected layer down the list.
- Layer Properties: Click this icon to give your layer a name and select if it is currently visible.