

You can accept payments in Web Form Builder by enabling the form payments option. You can then configure certain form elements as payment fields.
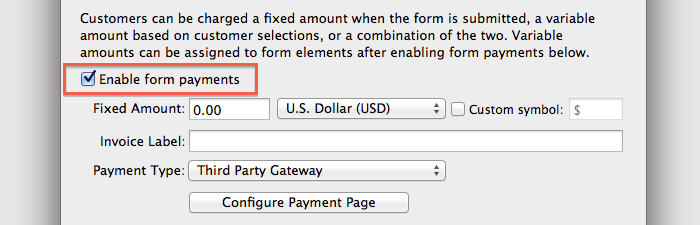
To enable form payments, click the Settings toolbar button and select the Payment tab. Check the box next to Enable Form Payments and choose a Payment Type. You can learn more about configuring the Payment tab here.
The Number, Drop Down, Radio Button, Checkbox, and List elements can now be used to place orders. Select one of these elements and click the Properties tab. You'll need to select an option from the Payments drop-down menu. Note: Only Drop Down and Radio Button elements can use the multiplier options.
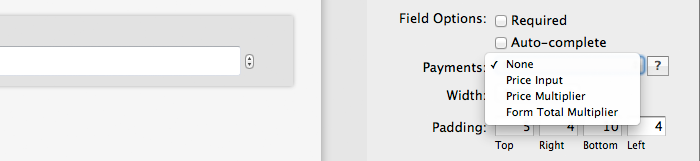
None
The element will not affect payments in any way.
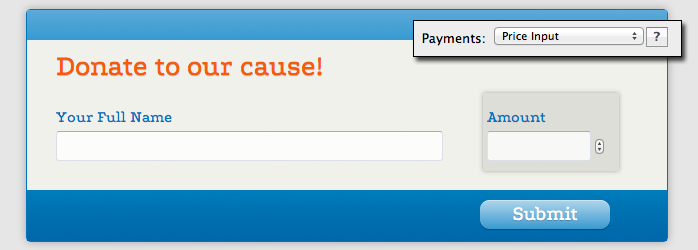
Price Input
This option is straight-forward: The buyer types a number into the field (if using a Number element) or selects a number from the drop-down, radio buttons, or checkboxes. That amount is charged for the selected item.
Example: Put a Number element on your form, switch to the Properties tab, and select Price Input from the Payments property. Now you can let people choose the amount of money they wish to donate to your cause.
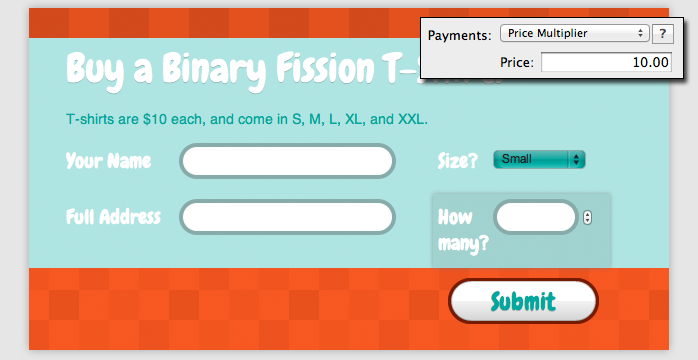
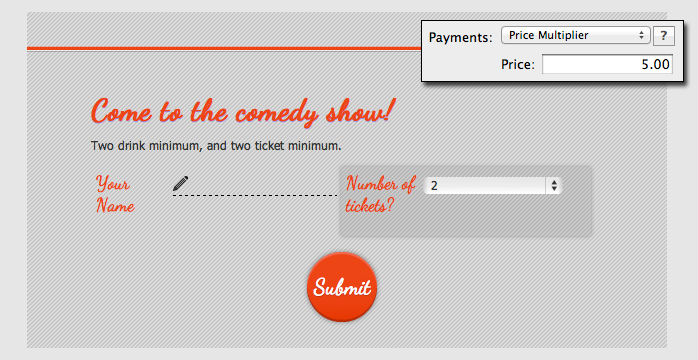
Price Multiplier
Selecting this option causes another property called Price to appear, where you should enter the price of the item. For the selected form element, the buyer chooses the quantity of the item by typing a number into the field (if using a number element) or choosing a number from a drop-down or set of radio buttons.
Example 1: You are selling t-shirts for $10. Your form features a required Number field in which the buyer is asked how many t-shirts to order. This field's Price property is set to 10.00.
Example 2: You are selling tickets to a comedy show, but tickets are only sold in pairs. Your form features a required Drop Down field in which all the choices are even numbers, and its Price property is set to $5.00.
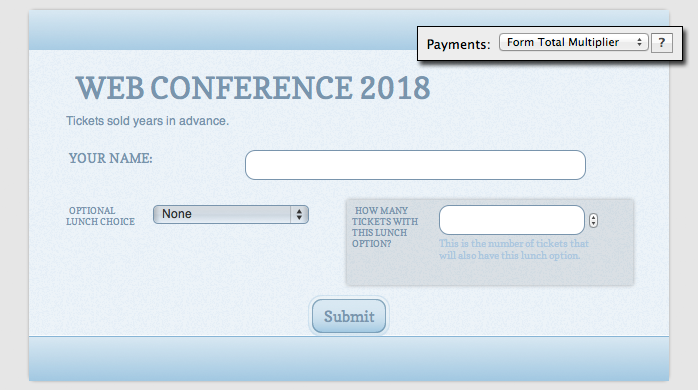
Form Total Multiplier
You can only select this option for one element of your form, because the amount entered into this field will multiply the entire total of the order.
Example: You are processing registrations to a web developer's conference. The fixed price of the form is $15 (the price of attendance) and the buyer can optionally select a lunch package as well. They can then purchase multiple passes with identical options by entering an amount into a Number element defined as the Form Total Multiplier.
Add text to invoice
This is a property that the Price Input and Price Multiplier options have. It allows you to include a description of the item on the invoice to help explain the charge.
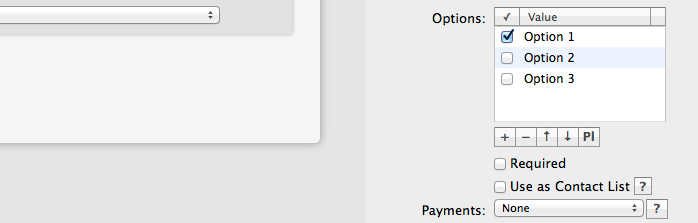
Drop Down, Radio Button, Checkbox, and List Items
Having elements with multiple options is great if you have different price tiers. But how do you set the prices associated with each item?
Select one of your Drop Down, Radio Button, Checkbox or List elements and click the Properties tab. Make sure that the Payments property is set to None. Look at the values under the Options property. They probably look something like this:
Now select any other option from the Payments property and look what happens to the values in the Options property:
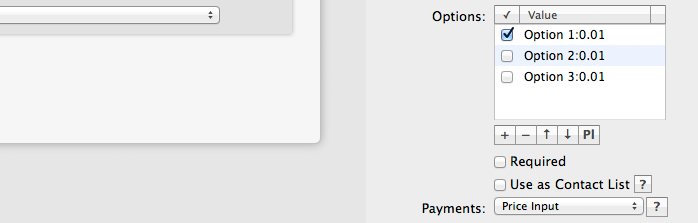
See the colon and numbers following each value? This part of the value is not visible on your form; rather, it's where you define the price or quantity associated with each item.
If you are using the Price Input payment property and want "Option 1" to cost $4.50, you need to simply enter "Option 1:4.50" as its value here.
If you are using one of the multiplier payment properties and want "Option 2" to select a quantity of 10, you need to enter "Option 2:10" as its value here.