

Now that your form is ready for the public, you’ll want to explore your options for putting it on the web. You can publish to S-Drive by entering your CoffeeCup Account information, export your form for hosting on a web server, or simply add it to a website project that you’re working with on your local computer.
Publishing to S-Drive with Your CoffeeCup Account Information
Once you’ve entered your CoffeeCup account information, you’ll be able to put your form on the web with a single click! The even better news is that it’s amazingly simple to set this up. To do so, click the Settings toolbar button and switch to the Form Publishing section.
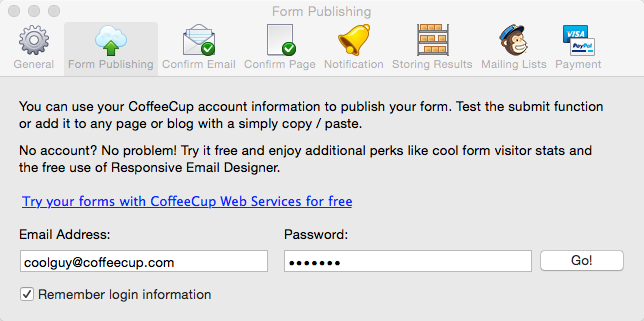
Simply enter your CoffeeCup user name and password in the Email Address and Password fields, then click Go! If you don’t have a CoffeeCup account, you can sign up on the CoffeeCup website. For more information about the benefits of this publishing method, read the S-Drive Forms chapter.
You can have more than one CoffeeCup address depending on how you’ve got S-Drive set up. Once you log in with your CoffeeCup account information, Web Form Builder displays all of your web addresses that support form publishing.

Select the one you wish to use for one-click publishing, and everything’s set up. Click Manage if you need to make administrative changes to your S-Drive account; click Refresh if you’ve enabled a web address that’s not in the list.
Now, when you’re ready to put your form online, just click the Publish toolbar button.

If you haven’t saved the form project, you’ll be prompted to do so. You can access these files later if you want to use your form somewhere other than S-Drive, such as a website project or uploading to a web server via FTP.
Web Form Builder will then publish your form to S-Drive, letting you know what’s happening along the way.
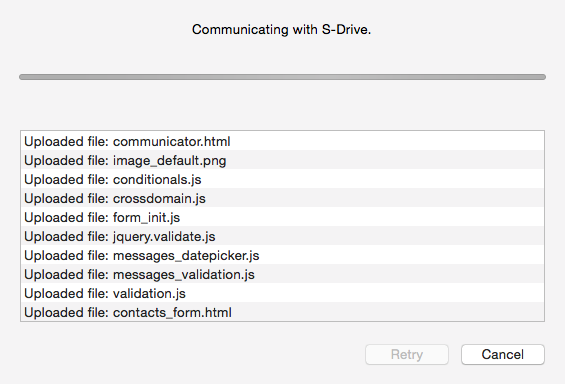
If there are no errors, then your form is available on the web! Congratulations!
Post-Publishing Options
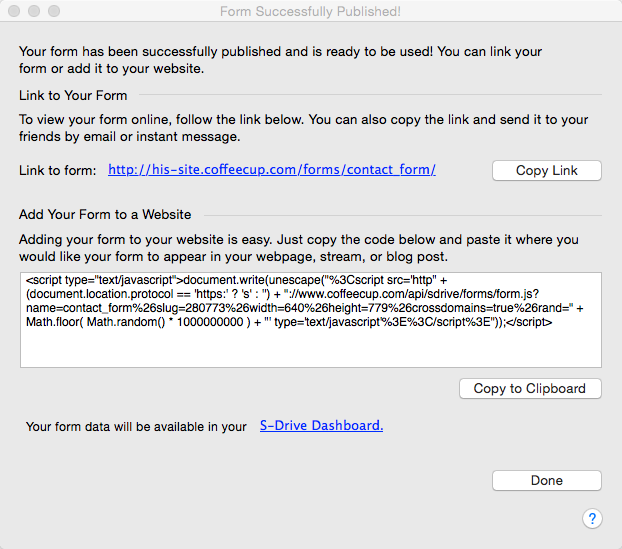
When your form has been successfully published, you’ll be given a link to where it can be accessed online and embed code that can be placed within any webpage, anywhere. Since all the form’s files are hosted on S-Drive, you can use this embed code anywhere you want without having to upload your files to another server.
Exporting and Uploading Your Form
Publishing your form to S-Drive is the easiest way to get your form on the web, but there are two other export options in the File > Export menu:
- Automated form processing: Save all your data using S-Drive, but use the provided HTML code to embed your form in a webpage.
- Manual server setup: Excludes S-Drive entirely and requires that you save your form results to a text file or a database and upload all the form’s files to your web server. HTML embed code is also provided.
Automated Form Processing
If you choose Automated form processing, all form result processing will be handled by CoffeeCup’s servers, and the data will be readily available in the S-Drive Dashboard so you won’t need to keep up with emails or databases full of form results. This means that you don’t have to configure any of the options in the Saving Data tab of the Settings menu, but you can always choose to receive form results by those additional methods as well.
There are two other really good reasons to choose this method:
- This way you can customize the CSS of your form (but make sure to rename the original file so you don’t save over it in case you change your mind!)
- This method allows you to bypass the use of JavaScript and directly paste the HTML. If a large percentage of your audience doesn’t use JavaScript, this is the way to go. (We understand this is rare, but it happens!)
You’ll be publishing your form to S-Drive first using your CoffeeCup account information. You’ll need to go to the Settings window’s Form Publishing tab to set this up if you haven’t done so yet.
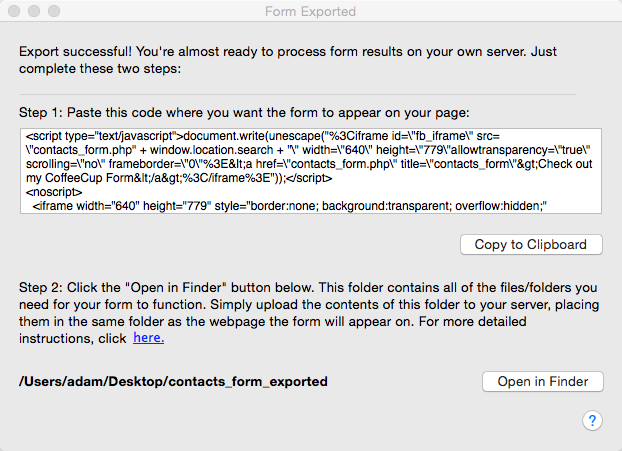
If you haven’t saved recently, you’ll be prompted to do so. Then the form will upload to S-Drive.
When it’s done, the Form Exported window will open telling you everything you need to do to share your form with the world. It’s an easy 3-step process.
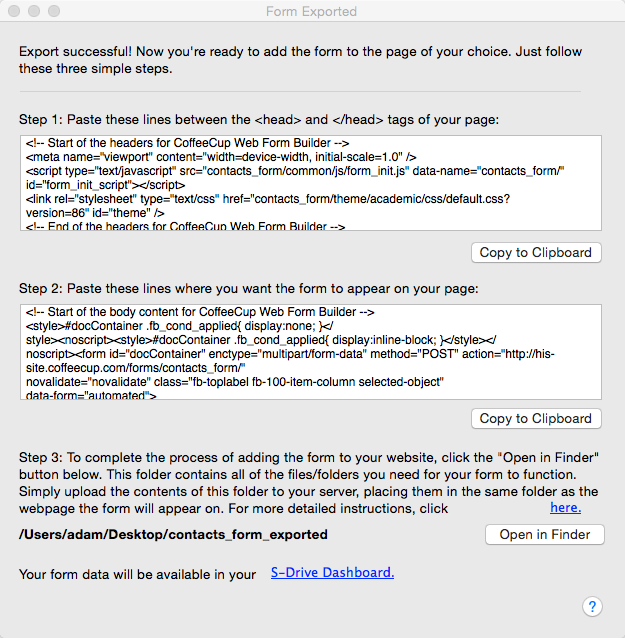
- Copy the code in step 1’s text box and place it in the <head> tags of the webpage.
- Copy the code in step 2’s text box and place it in the appropriate location in the webpage’s section.
- Upload the folder shown in step 3 to your server. You can do this with any FTP client. It’ll need to be placed in the same folder as the webpage you’re working with.
Manual Server Setup
Choosing to export for a manual server setup is slightly more complicated because you’ll need to configure your own methods to receive form results. You can set this up in the Settings menu’s Saving Data tab.
When you select this option, you’ll be prompted to save your form if you haven’t done so recently. Once this is completed, the Form Exported window will open telling you everything you need to do to use your form on any webpage. It’s an easy two-step process.
- Copy the code in the box by clicking the Copy to clipboard button and place it in the appropriate location in the webpage’s section.
- Upload all of the files from the folder shown in step 2 to your server. You can do this with any FTP client, including CoffeeCup’s own Direct FTP (https://www.coffeecup.com/direct-ftp/). The files will need to be placed in the same folder as the webpage you’re working with.
Publishing a Pop-Up Form
So far we’ve only discussed how to export a form so that it can be accessed by itself (full page) or alongside other content on a webpage (embedded). There is a third option, in which the form is displayed in a pop-up over the content on an existing webpage.
Pop-up forms can be displayed when a link is clicked, or automatically after a set number of seconds.
To configure a form to pop up when embedded, click the Settings toolbar button and navigate to the General tab.
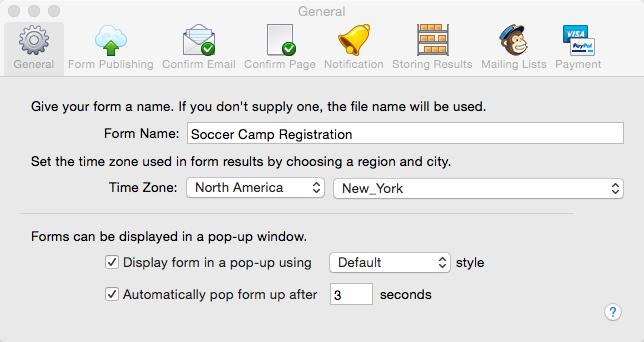
Check the box next to “Display form in a pop-up”, and when you publish or export, you’ll be given a special type of embed code that displays the pop-up form. From the drop-down menu, choose the style of pop-up you’d like to use.
Check the box next to “Automatically pop form up” and your form will automatically appear when the webpage it’s embedded in is loaded. Choose the number of seconds you’d like the form to wait before popping up.
That’s all it takes to set up a pop-up form! Now just choose your publish or export option like always and follow the provided steps. There’s just one major difference in this process.
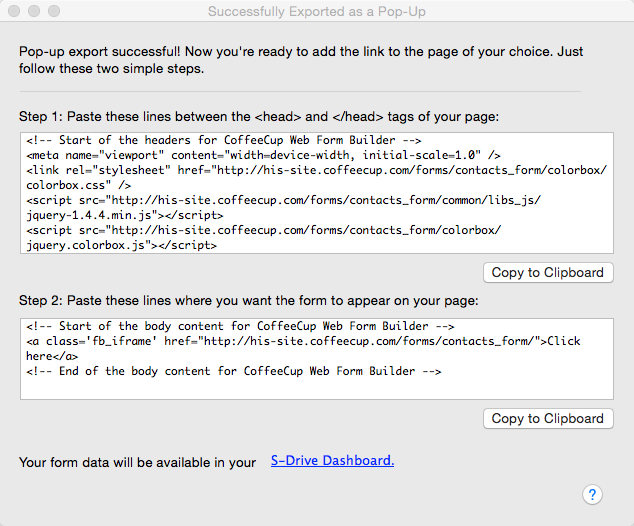
In a non-pop-up export, you are given embed code that creates the form on the webpage you place it within. But during a pop-up export, you are given code that simply creates a link, as seen in step 2 shown above. The first part of this link code is:
<a class=’fb_iframe’ href=”[your web address here]”>Then folllowed by the content of the link, which in this case is:
Click here
And finally, the closing tag:
</a>To customize your link, place the clickable content where the “Click here” is shown. It can be any text you like; it could even be another image. When clicked, this link pops up your form.
Note: If your form is configured to pop up automatically, the link content can be empty.