

So, you're ready to put your coding experience to the test by creating a page with frames? The HTML Editor can give you a boost with its Frame Designer. Here's how you work with it:
To open the Frame Designer, go to Insert > Frame Designer.
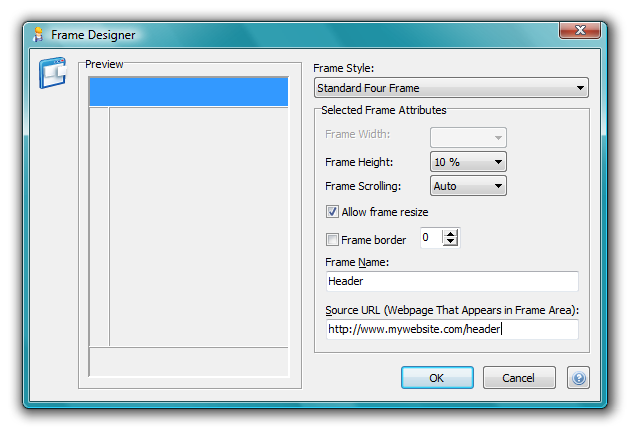
As you create your frames-based layout, you can keep an eye on how your design will look using the Preview pane on the left-hand side of the window. You can also use this area to select frames for individual editing. Just click a frame to edit it. You can tell which frame is selected, because it will be blue.
Here's how you use each of the options in this window:
Frame Style: Choose from a number of predefined frame styles. These styles include the number of frames, where they are located, and what function they perform. For example, Header Two Frame contains two frames, one intended for use as a header and another larger one where the body content goes.
Frame Width and Height: Use these drop-down menus to set the width and height of the selected frame. The width and height are measured in the percentage of the page the frame takes up. If the selected frame takes up the entire height or width of the page by default, you will not be able to adjust that attribute. For example, look at the header frame in the image above. Because it automatically takes up 100% of the width of the screen, you cannot adjust the width. Otherwise, what would go in the space it left behind?
Frame Scrolling: Choose whether your users can scroll within the frame. Auto adds a scroll bar when necessary, Yes adds a scroll bar at all times, and No will not add a scroll bar at any time.
Allow Frame Resize: Select this checkbox if you want your users to be able to resize the frames.
Frame Border: Select this checkbox to enable a frame border, and then enter the width of the border in the number field. 0 pixels is the thinnest border and 50 pixels is the largest. We recommend keeping the border between 1 and 5 pixels.
Frame Name: Enter a name for the frame here. You should use a name that relates to the frame's function.
Source URL: Enter the URL of the page you want to appear in the frame here. If you are linking to an external website, you must include the full link, including the http://www bit. If you are linking to a page or document in your website, you can use a relative link.
Note: Careful where you link! If the file you link to isn't located in your Working folder or your Website Project, it may not be referenced correctly — meaning the link won't work. Need more information about working with Website Projects? Check out this tutorial: Working With Website Projects.
Once you have entered the required information, click OK. The code will automatically be added to the page for you. If you have already created the HTML files that will be used as the source for each frame, click the Preview button in the Toolbar, and you'll be able to view your page, frames and all!