

The GIF graphic format has been around for a very long time, and was one of the first image formats to provide relatively realistic displays. The maximum color palette that was available at the time consisted of 256 colors, which allowed for the first somewhat photorealistic images on a computer.
GIF was very popular because it created these images using very small file sizes, which was extremely important at a time when portable storage (floppy disks) and long-distance data transfer (modem over telephone lines) were limited by the technology of the time.
Today we use GIFs for animations because of their small file size. Instead of embedding a large video or using a massive Flash animation, we can achieve animation with very small file sizes by using GIF's color palette. Also, aside from PNG, GIF is the only format that animates (and the only format supported by all browsers).
This image format achieves small file sizes by converting an image that may contain millions of colors to this tiny 256 color palette while preserving as much quality as possible. The conversion may or may not use a process known as dithering, which is the use of partially randomized color distribution to avoid weird looking banding in images. In other words, instead of a few big flat sections of blue, there may be many dots of varying shades of blue to give the image a more realistic and less computer generated appearance.
For example, look at these three photos:
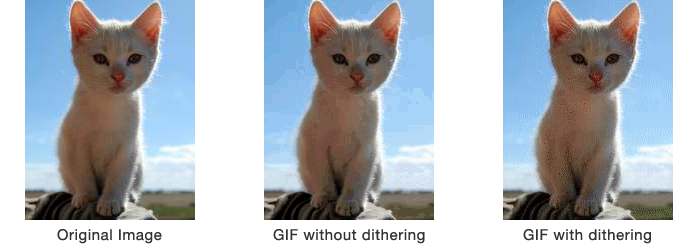
The image on the left is the original 16.7-million-color photo.
The image in the center is the same photo converted to a 256-color GIF palette with no dithering, and contains massive color banding as can clearly be seen in the sky.
The image on the right is the original photo converted to GIF using the Floyd-Steinberg dither method, and randomized dots are seen in place of the awkward color banding in the center image. The numerous red and green dots on the cat's body are a result of dithering, and may indicate that there could be a better dither mode to use that would result in less obvious dots.
Dither Modes in Animation Studio
When an image is added to an animation project, it must be converted to GIF. Your image is cut down from its large color palette to a mere 256 colors, and the currently selected dither mode is applied during this process. You can set the dither mode by going to Edit > Preferences, but the mode you select will only be applied to images that are added after the preference was selected.
There are 6 dither mode choices and one non-dithering mode. Some modes will work very well for a certain photo and terrible for others, so you may need to choose a different dither mode if the one you are currently using looks bad.
Here is the original photo and the same photo processed through each dither mode in Animation Studio:
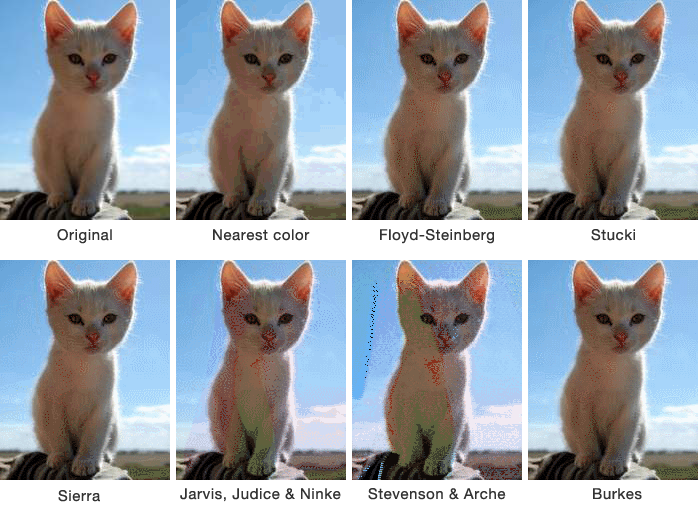
By looking at the quality of the image created using the Stucki method, this may be the mode you would want to use for a series of images of this kitten. Note that when you lean back from your computer monitor, it is much harder to tell the difference between the original photo and the Stucki image, while the color banding in the Nearest color image is still very obvious.
In this case, the Jarvis, Judice & Ninke and Stevenson & Arche methods were a disaster, but this may not always be the case. Sometimes these modes may be superior for a less realistic photo, like a cartoon.
Below is a full description of each of the dither modes shown above.
Nearest color matching w/o error correction
This method simply converts the image without dithering, using the closest match for each color. May result in obvious color banding that will reduce the realism of the image.
Floyd-Steinberg Error Diffusion
This is the default dithering mode because it generally yields the best results. It creates a fine-grained dither that diffuses to neighboring pixels.
Stucki Error Diffusion
Generally creates more coarse-grained dithering, but sharpens the image.
Sierra Error Diffusion
Creates coarse-grained dithering but does not often create visual artifacts (anomalies) in the image.
Jarvis, Judice & Ninke Error Diffusion
Creates coarse-grained dithering using a different method from Sierra, and often creates few visual artifacts (although this is not the case in the example shown above!)
Stevenson & Arche Error Diffusion
Creates coarse-grained dithering with results that usually contain a high color contrast, as is visible in the example shown above.
Burkes Error Diffusion
Creates coarse-grained dithering that can sometimes yield erratic results