

When working in Animation Studio's Frames tab, there are two panes on the right side that are used to configure settings that apply to the entire animation or just to the selected frame(s). Below the Frame Properties is a property labeled "Disposal" that is extremely useful when creating optimized images.
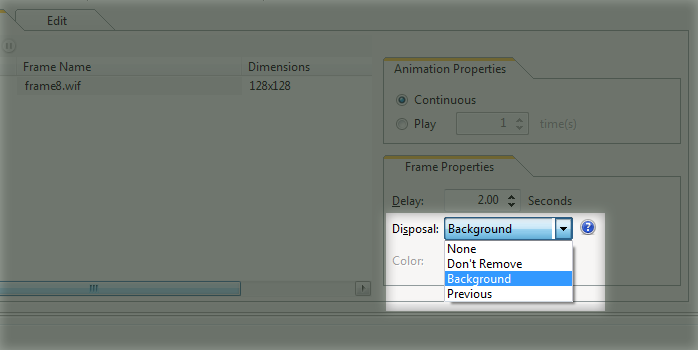
This is where you can configure the selected frame's Disposal Method. This describes what should be done with the animation canvas after the selected frame has been displayed for the amount of time selected in the Delay property. For many animations, you won't need to change the default disposal method. But there can be some situations, like when the file size needs to be reduced, where this can be very useful.
Here's how the flow of each frame goes in an animation:
- The current frame is drawn onto the canvas.
- The current frame is displayed for the amount of time selected in the Delay property.
- When the Delay time has passed, the canvas is cleared according to the selected Disposal method.
Each method has a different main purpose:
- None: No action is taken when changing frames. Generally used when replacing a full-size non-transparent frame with another one.
- Don't Remove: When the next frame is displayed, the current frame will not be removed from the screen. If the next frame has any transparencies, the current frame will still be visible in those sections.
- Background: When the next frame is displayed, the current frame is completely removed from the screen. If the next frame has any transparencies, the current frame still will not be visible in those sections; instead, whatever is behind the entire animation will be visible.
- Previous: Before the next frame is displayed, the current frame is removed, but the canvas is restored to the state of the last frame that used the Don't Remove disposal setting.
So why would you ever want to change the disposal method? It's especially important when reducing the file size of the animation, a process known as "optimizing" the animation. Since an animation is really a collection of non-moving images, a 10-frame animation can have a file size that's 10 times the size of a still image! You may not want a huge animation loading every time your website is accessed, because the bigger it is, the longer it takes to be seen. Ideally, your website content should load as instantly as possible. Those on slower connections may not see your animation for quite a while if the file size is approaching 2 MB.
If only small parts of the animation are changing from frame-to-frame, you can choose the "Don't Remove" disposal method and layer a small amount of data on top of it.
Here's two examples:
Two full frames:
| First Frame | Second Frame | Final Animation | ||
 |
+ |  |
= |  |
One full frame, one partially transparent frame:
| First Frame | Second Frame | Final Animation | ||
|
+ |  |
= |  |
In the first example, the intended animation has been acheived, but two full frames were used. In this case, the disposal methods used did not matter at all. But in the second example, most of the duplicated pixels have been removed from the second frame. The first frame uses the "Don't Remove" method, and the second frame uses the "Background" method. The result is the same animation, but with a 25% reduction in file size! (You may also notice that the orange triangle is a little cleaner in this method, so it's actually a higher quality animation.)
In short, if you are not using transparencies in any of your frames, you do not need to mess with the Disposal property. But with a little bit of effort, you can make highly optimized images by mastering disposal methods.