

Using the inventory tool, you can keep track of your inventory and transaction history. In this section, you’ll learn how to use it.
Please keep in mind that although this tool is a great way to help keep track of your orders, it shouldn’t be your only means of keeping track of your inventory. Your payment providers have excellent tools you can use to keep track of your business.

To use this tool, click the Your Shop button in the Toolbar.
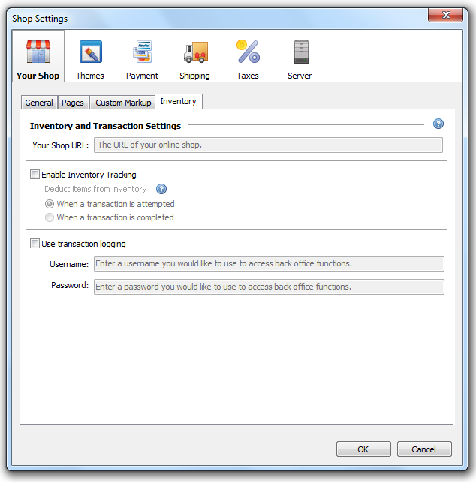
This opens the Your Shop tab in the Shop Settings window. Switch over to the Inventory tab.
Before you can adjust any of these settings, you must choose a publishing destination from the Server settings window, which you can set by clicking the Server button in the toolbar. The Inventory and Transaction Settings will change somewhat depending on whether you’ve chosen a CoffeeCup S-Drive account or an FTP account as your publishing destination.
Inventory Settings
Shopping Cart Creator Pro gives you the option to view your pending and complete transactions on a secure webpage on your server. (Just FYI, this feature will only work on a Linux server that supports .htaccess.) Follow these steps to set up this page:
1. Select one or both of the checkboxes to determine what information will be included on the webpage:
- Use inventory tracking: Keeps track of how many of your products are left in stock.
- Use transaction logging: Keeps track of how many transactions have been made and what items have been sold. (This option isn’t included if S-Drive is selected, because transactions are automatically recorded in the S-Drive Shop dashboard.)
2. Depending on which checkbox(es) you selected, enter the following information in the provided fields:
- Your Shop URL: The URL for the homepage of your online store (e.g. http://www.mysite. com/store/, http://www.mystore.com). This setting is only included if FTP is set as the publishing destination.
- Deduct items from inventory when a transaction is attempted: Applies changes to your inventory when a user has added an item or items to their cart. If the user chooses not to go through with the purchase, the inventory count will be reset when the browser session has been cleared. This is a PHP setting that varies from server to server, but usually ranges from 15-30 minutes. Use this option if you would like to give your customers more time to shop after they have added an item to their cart.
- Deduct items from inventory when a transaction is completed: Applies changes to your inventory only once an order is complete.
- Username: The username you would like to use to access the secure webpage. You choose this username, so it can be anything you want.
- Password: The password you would like to use to access the secure webpage. You choose this password, so it can be anything you want.
3. When you’re done entering this information, click OK.
4. After you have finished configuring this information, click the Inventory button in the toolbar. This syncs the inventory on your server to the inventory on your computer.
Get in the habit of clicking this button! Without fail, you should sync your inventory every time you publish any changes to your shop. Just click the Inventory button, and then upload your work.