

When you first open Website Access Manager, you will be prompted to create a new profile. The first step checks to see if your server is compatible with the program. Because .htaccess only works with Apache and Apache-compatible servers (including lighttpd and EhttpD), Website Access Manager comes with a built-in tool to determine if your server fits these requirements. Your server should have PHP 4.47 or higher installed in order to use this tool.
If you are using a Microsoft-hosted server, you won’t be able to use Website Access Manager.
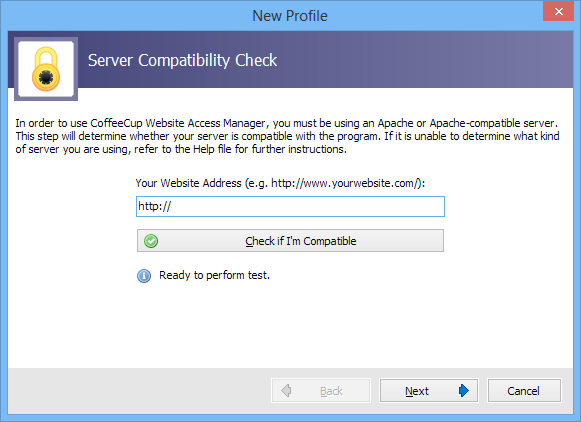
Step 1 – Compatibility Check
The first step determines if your server is compatible with .htaccess.
S-Drive Support
At this time, Website Access Manager has not been updated for S-Drive support. We are however working on a solution for our S-Drive customers and hope to have something ready for use this fall. For a complete list of which programs do work on S-Drive, see What programs can be used with S-Drive.
Enter your website address into the provided field and then click Check if I’m compatible. If your server is compatible, you will receive this message:
Your web server is compatible with .htaccess. Press Next to continue.
The message will also contain your specific server information. If your server is compatible, click Next. If your server is not compatible with .htaccess, you will receive this message:
Your web server may NOT be compatible with .htaccess.
The message will also contain your specific server information. If you think you may have received this message in error, you can manually check your PHP settings. To do so, open Notepad and copy and paste this code into the document:
<?phpphpinfo();?>
Now go to File > Save As and save the file as phpinfo.php. Make sure you change the Save as Type to All files. Next, upload this file to your server using an FTP client such as Direct FTP or Free FTP. Once the file is on the server, go there with your favorite web browser, and all the PHP information about the server will be displayed. You can also contact your hosting provider to see what your server is running. If you don’t have an Apache or Apache-compatible server, ask your hosting provider to upgrade your server.
This step is extremely important! If your server is not compatible with .htaccess, Website Access Manager may not function properly. We recommend trying the program and testing it thoroughly before purchasing to ensure that it works as intended.
Step 2 – FTP Settings
In order to properly use Website Access Manager, you must be connected to your server via an FTP connection. Step 2 allows you to enable your FTP settings. If you are unsure of any of this information, contact your hosting provider.
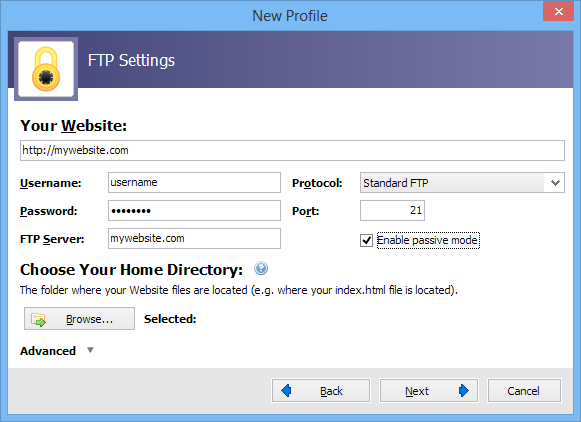
Your Website
The URL of your website, including http://www. (e.g. http://www.yourdomain.com).
Username
The FTP username assigned to you by your web hosting company. Be sure to enter the information exactly how it was given to you by your provider. Usernames are case sensitive, so if there are capital letters in your username, you must enter it that way.
Password
The FTP password assigned to you by your web hosting company. Be sure to enter the information exactly how it was given to you by your provider. Passwords are case sensitive, so if there are capital letters in your password, you must enter it that way.
FTP Server
The location where you will upload your website files. It should be in the form of an IP address, your domain name (e.g. yourdomain.com), or your domain name preceded by ftp. (e.g. ftp.yourdomain.com). Do not include ftp:// or http://. It is up to your web hosting company to assign your FTP server host name, so you will need to find out from them what it is.
Examples of valid server names:
ftp.mysite.com 24.24.100.100 mysite.com
Examples of invalid server names:
ftp://ftp.mysite.com http://www.mysite.com
Home Directory
Use the Browse button to browse your server for your home directory. Your home directory is the folder where your website files are stored. Common names include www, public_html, or web. If you aren’t sure of this information, contact your hosting provider.
Advanced
Clicking this option allows you to enable or disable passive mode and to add or edit a server root. If you wish to hide these options, click Advanced again.
Enable Passive Mode
Enable passive mode if you experience issues connecting.
Server Root
The folder where your website is stored. Common names include /, public_html, www, httpdocs, htdocs, html, and web. If you are unsure of what your server root is, enter your URL in the Website URL field, and then click the Auto-Detect button. This will automatically find your server root and enter it in the corresponding field.
When you finish entering this information, click Next. This will bring you to the program workspace. For more information about how to use the tools contained therein, read General Overview.