

For Google Apps to work with your own custom domain, you must configure the domain with the correct DNS MX records. These records tell your domain where email should be sent. Without the correct DNS setup, emails will not arrive. Below you will find instructions on how to setup your MX records for some of the top hosting companies out there. If these instructions seem to complex for you, all of these companies will complete the steps for you. Simply submit a support request with them and sit back until the DNS changes have propagated.
Gmail MX Record Values
| Name/Host/Alias | Time to Live (TTL*) | Record Type | Priority | Value/Answer/Destination |
|---|---|---|---|---|
| Blank or @ | 3600 | MX | 1 | ASPMX.L.GOOGLE.COM |
| Blank or @ | 3600 | MX | 5 | ALT1.ASPMX.L.GOOGLE.COM |
| Blank or @ | 3600 | MX | 5 | ALT2.ASPMX.L.GOOGLE.COM |
| Blank or @ | 3600 | MX | 10 | ALT3.ASPMX.L.GOOGLE.COM |
| Blank or @ | 3600 | MX | 10 | ALT4.ASPMX.L.GOOGLE.COM |
* If your settings do not show a TTL option do not worry. You do not need to enter this field, it is optional.
Patience is a Virtue
While your changes will appear in the name servers within minutes, it is important to note that DNS changes can take 24-48 hours to propagate to all name servers throughout the 'net. There is no "magic" that can be done to make this go any faster. After this time period, if your email is still not arriving, contact your hosting provider through the corresponding links below.
GoDaddy™
- Login to your GoDaddy account and click Domains and then locate your domain and click the Launch Icon. This will take you to the Domain Details Page.
- Click on the DNS Zone Tab and then click Edit. You will now be in the Zone Editor.
- Scroll down to the MX (Mail Exchanger) and click the Quick Add Icon 5 times.
- Fill out the 5 empty fields so that they look like this.

- Scroll down to the bottom and click Save Zone File.
Your GoDaddy MX Records Succesfully Updated!
If you should have any issues you can contact GoDaddy at the following locations:
- Call +1 (480)-505-8877
- Send GoDaddy an Email
- Live Chat with GoDaddy
1&1™
To edit the MX Record you must supply at least two mail server addresses. The addresses must be domains or subdomains and cannot be IP addresses.
- Log in to the 1&1 Control Panel using your Customer ID OR domain name and your password. If you have only one package, you will land on the Administration page. If you have more than one package, select the package in question to reach its Administration page.

- Click the Domain Center link from the Domains panel.

- Check the box next to the domain to select it and then click the Edit DNS Settings button from the Domain Settings drop-down menu.

- You will not be able to edit the MX record for your domain unless you are using the 1&1 name servers. If you are using a CNAME record or other DNS, you will not be able to make a change to the MX records within the 1&1 Control Panel and will need to make this change with your current DNS host.
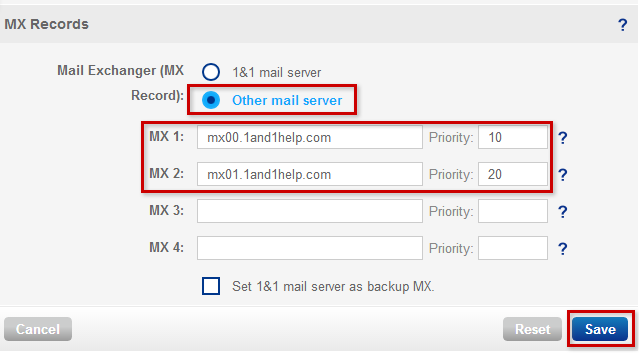
Please note that mail server priority is usually set in multiples of 10 with the lowest number taking top priority (kind of like golf). You must enter at least two mail server addresses for the MX record.
- Select Other mail server from the MX Records section.
- Enter the first mail server address into the MX 1 / Prio text box followed by the mail server Priority in the second text box.
- Enter the second mail server address into the MX 2 / Prio text box followed by the mail server Priority in the second text box.
- Repeat for the third and fourth mail servers if needed although only two addresses are required.
- Click the Save button to save your changes.
A confirmation page is displayed informing you that the changes will be updated accordingly.
Your 1&1 MX Records Succesfully Updated!
If you should have any issues you can contact 1&1 at the following locations:
- Call +1 (866)-991-2631
- Send 1&1 an Email
Yahoo™
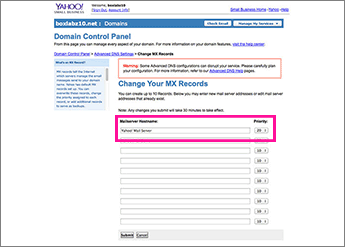
You can edit and delete existing MX records from the Advanced DNS Settings area of your Domain Control Panel.
To access the Domain Control Panel:
- Sign in to your Business Control Panel. (You may be prompted to enter your username and password.)
- Once signed in, you'll see modules for each of your domain names on the Manage My Services page. Select the Domain Control Panel link for the domain whose record you want to edit.
- Click the Change MX Records button.
- Enter a new mail server host name or select a new priority for an existing record.
- Click Submit.
You'll return to the Advanced DNS Settings page. Your newly edited MX record will appear in the MX records list.
Your Yahoo MX Records Succesfully Updated!
If you should have any issues you can contact Yahoo at the following locations:
- Call +1 (800)-318-0612
- Send Yahoo an Email
Hostgator™
- Log into your Cpanel.
- Click the MX Entry icon.
- Select the problematic domain name from the drop-down list.
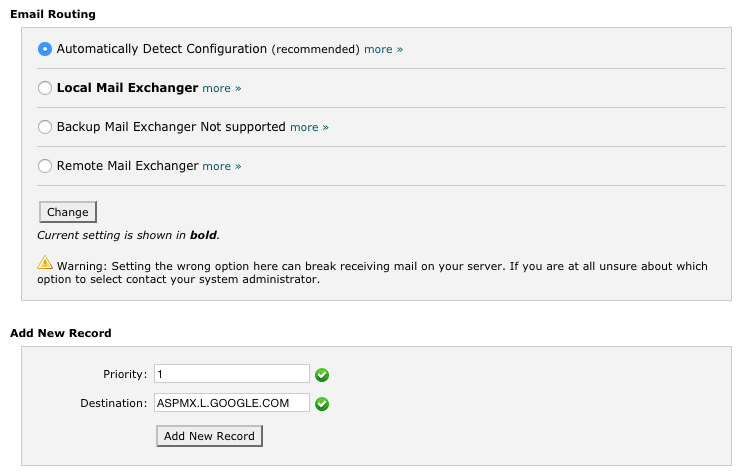
- Choose Automatically Detect Configuration and hit the Change button.
- Under "Add New Record", enter mail.thedomainname.com (or whatever you were provided by the host) for the Destination value. Priority will normally stay equal to 0 [zero].
- Click the "Add New Record" button.
If you wish to point it to another server using the same domain:
- Log into your Cpanel.
- Click the MX Entry icon.
- Select the problematic domain name from the drop-down list.
- Choose Automatically Detect Configuration and hit the Change button.
- Under "Add New Record", enter mail2.thedomainname.com (or whatever you were provided by the host) for the Destination value. Priority will normally stay equal to 0 [zero].
- Click the "Add New Record" button.
- Go to the cPanel Home and click the Simple DNS Editor icon.
- Select the same domain from the drop-down.
- Under "Add an A Record", enter mail2.thedomainname.com (or whatever you put for the MX Destination) in the "Name" field.
- In the "Address" field, enter the other server's IP address.
- Click the "Add A Record" button.
Your Hostgator MX Records Succesfully Updated!
If you should have any issues you can contact Hostgator at the following locations:
- Call +1 (866)-964-2867
- Send Hostgator an Email
iPage™
- Log in to your Control Panel.
- Go to Domain Central.
- Click on the domain you want to edit.
- Click DNS.
- From Modify, select MX Records.
- Enter the priority: the lower the number the higher the priority; i.e the system tries the server with priority 10 is before the server with priority 20
- Enter Host: * and @ are wild cards. You can also set a specific host, such as pop, imap, smtp, outgoing, incoming, etc.
- Points To: enter a valid domain, with a valid A Record, to which the mail will be routed
- Click Add. A confirmation message will be displayed.
- To modify a setting, select Edit or Remove from the Action dropdown menu next to the MX Record.
Your iPage MX Records Succesfully Updated!
If you should have any issues you can contact iPage at the following locations:
- Call +1 (877)-472-4399
- Send iPage an Email
- Live Chat with iPage
Network Solutions
To update MX records
- Log in to Account Manger.
- Within Account Manager, use the drop down under My Domain Names to choose the domain you’d like to manage and click the Go button.
- In the green box, select Change Where Domain Points.
- Select Advanced DNS.
- Click the Continue button.
- If the domain name was not previously pointed to Network Solutions® nameservers (DNS) you will receive a page with messaging regarding this change. If you’d like to continue, click the Move Nameservers to Network Solutions® button.
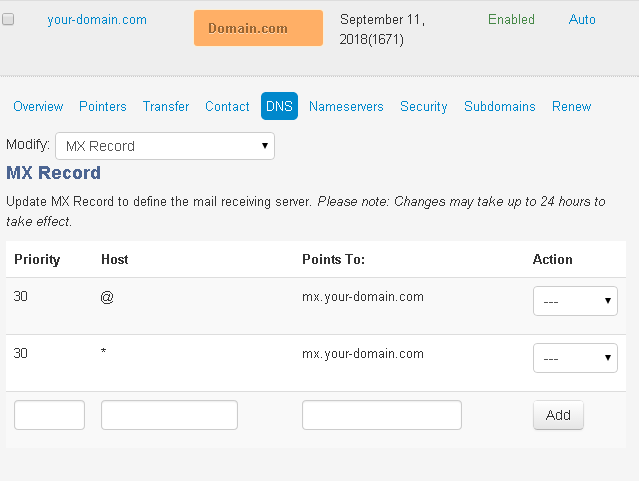
- In the Mail Servers (MX Records) section, click Edit MX Records.
- Your current MX records are listed in editable form, and any Network Solutions® service that is associated with the MX record is listed under the Mail Server text box.
To add/edit MX records:
- Enter or edit the MX record in the Mail Server text box and its associated priority number in the Priority text box.
- Click Continue.
To delete MX records:
- To the right of the MX record, select the check box in the Delete column.
- Click Continue.
- Review the list of requested changes.
- Click Continue.
Your Network Solutions MX Records Succesfully Updated!
If you should have any issues you can contact Network Solutions at the following locations:
- Call +1 (800)-333-7680
- Send Network Solutions an Email