Have you ever wanted to update the tags that appear in the Code Completion list in the HTML Editor? It's actually quite easy. For example, let's say you wanted to add a custom attribute for the img tag. Follow these steps to learn how you would do this:
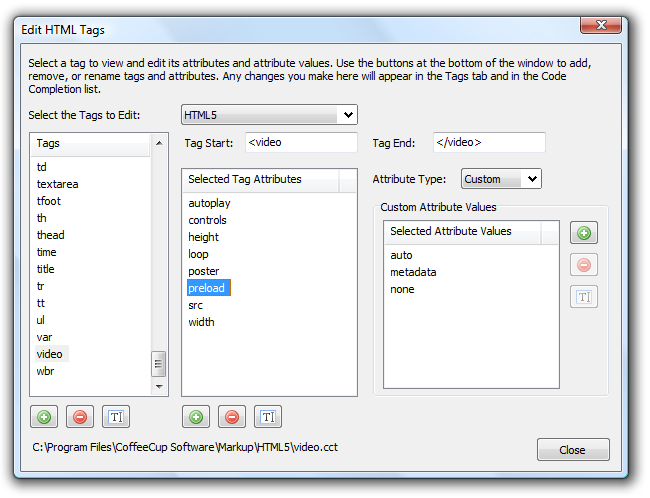
- Go Edit > Add/Edit HTML Tag Markup. This opens the Edit HTML Tags window, pictured below.
- Select the element you want to change from the Elements list on the left-hand side of the window. In this example, we are editing the img element, so select it from the list.
- When you click the img element, all the available attributes will appear under the Attributes list.
- At the bottom of the Attributes list, you will see a green plus sign icon. Click this icon to add a new attribute to the list. By default, it is called Attribute1.
- Make sure Attribute1 is selected, and then click the Edit Attribute icon, which is located at the bottom of the Attributes list. Change the name to longdesc.
- Click Close.

Now when you add an img element to your HTML document, the longdesc attribute will show up in the Code Completion list. It will also appear in the Code tab on the left-hand side of the program when HTML is selected. You can use this process to create as many custom elements as you want, or to modify existing ones.
Note: In order for your custom markup to appear in the Code Completion list, your document must have the same DOCTYPE as the DOCTYPE you selected in the Edit HTML Tags window.
We should also note that any customizations you make will be lost when you uninstall or upgrade to a newer version of the software. To prevent this from happening, you should back up your Markup folder. Here's how:
- Go to C:\Documents and Settings[USERNAME]\Application Data\CoffeeCup Software\CoffeeCup HTML Editor\Markup (Windows XP) or C:\Users[USERNAME]\AppData\Roaming\CoffeeCup Software\CoffeeCup HTML Editor\Markup (Windows 7/Vista)
- Right-click the Markup folder and select Copy.
- Go to the folder or location where you want to save the backup, right-click the background, and select Paste. The pasted folder will be your backup.
One last note: To learn how to customize PHP variables in the Editor, read this article: How Do I Customize PHP Variables?

