

Unlike people, not all text is created equal. Some text is bold or italicized. Other text can be different colors, such as red, blue, or orange. Some text is huge, whereas other text is downright tiny.
If all those different formats didn't inspire you to change the style of the text on your page, nothing will! There are a couple of different ways to change the appearance of your text in the HTML Editor. To tweak basic attributes, such as size, color, and effects like bold, italic, and underline, there are a few quick'n'easy tools you can use. Open up the Format menu and take a look at the first half of the options:
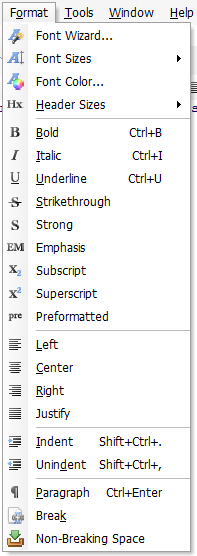
These options are pretty self-explanatory. To use them, just highlight the text you want to change, and then select the attribute you want to apply. You can also access these options with the keyboard shortcuts displayed in the Format menu, as well as in the Code and Visual Editor right-click menu and toolbar.
To make more in-depth changes to your text, use the Font Wizard. Here's how:
Step 1
Highlight the text you want to change.
Step 2
Open the Font Wizard by going to Format > Font Wizard, clicking the Font icon in the Code or Visual Editor toolbar, or right-clicking and selecting Font > Font Wizard...
Step 3
Start working with the options in the Font Wizard! This tool allows you to change the typeface, effects (bold, italic, strikethrough, or underline), position (normal, subscript, or superscript), size, and color of the font. Let's take a deeper look at these options:

Fonts
Select the font you want to use from this list, and then apply it to your text using one of the three Add as Font buttons to the right.
Why are there three font boxes? Well, just like fonts, not every computer is created equal. Your computer might have some crazy-funky-fresh font installed that'll look just perfect on your website, but that same font might not be installed on someone else's computer. When that happens, the other person's web browser defaults to a default to a generic font (usually Arial or something similar). This can mess up the appearance of your website, with words running out of boxes, elements getting pushed out of the way of marauding text, and other such chaos that basically messes up your entire website. Yikes!
You can avoid this mess by using web-safe fonts. These are fonts that are installed on every computer by default, which means that they will always display correctly on every computer. They include such timeless classics as:
- Arial
- Arial Black
- Courier New
- Times New Roman
- Comic Sans MS
- Georgia
- Impact
- Trebuchet MS
- Verdana
So, if web-safe fonts are so, well, safe, then why doesn't everyone use them? Frankly, because they're kind of boring. Fortunately, the HTML Editor gives you three choices. For Font 1, use your first-choice font. Go as funky and crazy as you want, and if the font happens to be installed on your user's computer, awesome! If not, the browser can just look for the second font you specified. Make Font 2 and Font 3 web safe, and you'll be golden. For extra security, you can also select a generic font, which always displays correctly, from the Generic drop-down list. Generic fonts are totally no-frills, but you can rest assured that they'll always work, even in the very, very rare instance when a web-safe font might not.
By specifying multiple fonts, you can tell the browser to first try a fancy, non-web-safe font. That way, you can make sure that your website will look good whether you're using a cool, custom font or a secure, web-safe font.
Effects
Select from bold, italic, strikethrough, or underline.
Text Position
Select whether your text will appear normally or as a subscript or superscript.
Size
Select a font size from 1 (8 pt) to 7 (36 pt).
Color
To select a color for your text, click the color swatch. This opens a drop-down list of 40 basic colors. If you see a color you like, click it. If you want to see even more colors, click More Colors. This opens a rainbow gradient that allows you to adjust brightness and select from a wider range of colors.
Step 4
When you're done formatting your text options, click OK. All the code will automatically be added to your page for you!