

There are two different methods of adding an image to your page: Using the Insert Image window and using the Resource browser. The Insert Image window is a good choice if you want to specify image attributes and/or create a thumbnail version of the image. The Resource browser is best if you want to skip all that stuff and just add an image to your page.
Quick Links:
Method 1: Insert Image Window
This method is a good choice if you want to specify image attributes and/or create a thumbnail version of the image. There are a few different ways to reach the Insert Image window:
- Go to Insert > Image
- Click the Image icon on the toolbar
- Right-click and select Image...
- Use the keyboard shortcut Ctrl+M
Each of these options opens the Insert Image window, which allows you to choose an image and specify additional information, like alt text, alignment, border, size, and other fancy stuff, like adding a link or creating a thumbnail.

Here's what you do once the window is open:
Step 1: Locate Your Image
Use the file browse area on the left-hand side of the window to look through your computer for the image you want to use. When you find the image you want, click it with your mouse. For now, the image may be located anywhere on your computer — you'll get a chance to save it in your Website Project or Working folder in a few steps. (If the phrases "Working folder" and "Website Project" left you scratching your head, take some time to check out this article: Working With Website Projects.)Step 2: Enter General Information
Now you can use the fields under the General tab to enter some additional information about the image. It's by no means necessary, but it can help your page load more efficiently and make your page more accessible to disabled users. We'll go through each field step by step, and you can decide which you want to include.
Image
This is where the path to the image goes. If you have selected an image using the file browse section on the left-hand side of the window, the path will automatically appear in this field for you. If you just happen to know the file path off the top of your head, you can also enter it manually.
Alt
This field contains what's called "alt text," which is a description of the image that is displayed when the image cannot be shown. This is most commonly used in text-only or speech browsers, which the blind use to access the Internet, but it also appears before the image loads if someone is surfing the Web on a slow connection. You should always include detailed alt text for all prominent or contextually important images on your webpage, otherwise you run the risk of some users not getting the full gist of your webpage.
Title
A title is a description of the image that pops up in a tool-tip when the user holds their mouse over the image. This can be used to provide additional information about the image.
Align
Select the alignment of the image from this drop-down list. The options should be pretty self-explanatory, but in case you're wondering about them, you can check out a handy guide at HTML Code Tutorial.
Width and Height
These fields display the width and height of your image, and these attributes are included in the HTML for your page. This is helpful because it tells the browser how much space to allot for the image. If a user is viewing your webpage on a slow connection, this will ensure that the text is formatted properly even before the image loads. For that reason, it's important to include the size measurements. If you decide you'd rather not, just uncheck the Include size check-box.
You can also use these fields to re-size your image, but be careful if you do! The image re-size feature should only be used to make minor adjustments, since the HTML Editor doesn't maintain the aspect ratio. This means that unless you know the exact ratio of the width to the height, your image will likely end up distorted. If you need to make changes to the size of your image, save yourself a headache and use an image-editing program.
URL to Link To
If you would like to make the image into a clickable link, use this field to enter the URL where your user will be taken when they click the image. If you are linking to an external website, be sure to include the full web address, including the http://www bit.
If you are linking to a page or document in your website, you can use a relative link by clicking the file icon to browse your computer for the file you want to link to.
Careful where you link!
If the file you link to isn't located in your Working folder or your Website Project, it may not be referenced correctly — meaning the link won't work. Need more information about working with Website Projects? Check out this tutorial: Working With Website Projects.
Step 3: Create a Thumbnail
This step is totally optional. Thumbnails are usually used to link to the larger original version of the image. This gives you a bit more design freedom, since you don't have to work around tons of large images, and users on slow connections will thank you for not increasing download times with tons of large files.
If you're just adding a regular ol' image to your page, you can skip this part and go straight to Step 4. But if this sounds useful, switch over to the Thumbnail tab and follow along!
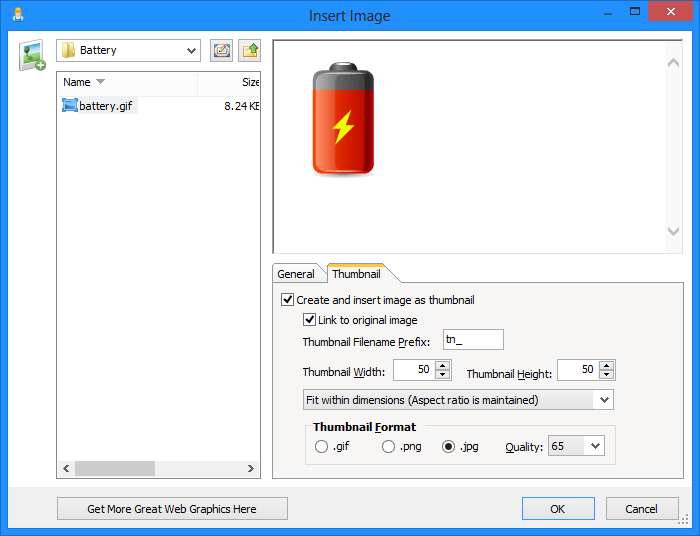
Create and Insert Image as Thumbnail
Select this check-box if you would like to use the image as a thumbnail.
Link to Original Image
Select this check-box if you would like the thumbnail to link to the original image.
Thumbnail File name Prefix
This is a prefix that appears at the beginning of the thumbnail file name. Since this feature creates a new, smaller version of the image you added, it needs a new name to differentiate it from the original. The default prefix is tn_, but you can change it to whatever you want.
Thumbnail Width and Height
Enter the width and height of the thumbnail here. The HTML Editor maintains the aspect ratio for thumbnails, which means your thumbnail won't end up distorted.
Thumbnail Format and Quality
Choose the desired image file format (.gif or .jpg) and quality (65-95). Keep in mind that high-quality images look better, but are also larger, which can make for longer download times. In today's day and age, a high-quality image isn't really going to slow anyone down, so don't feel guilty about splurging and going with a quality of 95.
Step 4: Adding Your Image to Your Working Folder or Website Project
When you're done entering all the additional information, click OK. This opens a window that asks if you want to copy your image file to your Website Project.
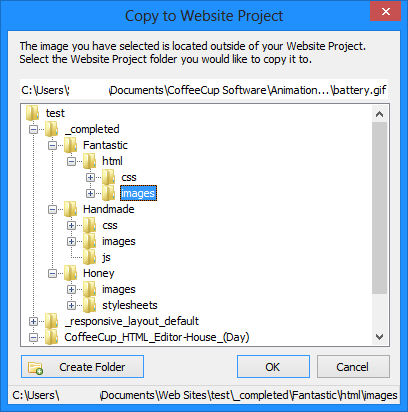
We can't stress enough how important it is to save your images to your Website Project or Working folder! If you don't, they may not be uploaded to your server, which means they won't show up on your Website. Instead, you'll get those annoying red X's — not to mention a huge headache.
Method 2: Resource Browser
Using this method, you can simply drag an image from the Resource browser on the left-hand side of the screen to your page. Here's the step-by-step version:
Step 1
Open the My Computer tab in the Resource browser on the left-hand side of the program.
Step 2
Use the area at the top to browse your computer for the image you want to use. Selecting a folder in the top area opens all its files in the bottom area.
Step 3
We can't stress enough how important it is to save your images to your Website Project or Working folder! If you don't, they may not be uploaded to your server, which means they won't show up on your Website. Instead, you'll get those annoying red X's — not to mention a huge headache.
Step 4
The image will now appear on your page without any special formatting. If you need to work with the alignment, border settings, alt text, or any other associated attributes, switch to the Code Editor if you aren't there already, and then edit the code directly.